- Meta Quest 4
- Google Pixel 9
- Apple Vision Pro 2
- Nintendo Switch 2
- Samsung Galaxy Ring
- Yellowstone Season 6
- Recall an Email in Outlook
- Stranger Things Season 5
Digital Trends may earn a commission when you buy through links on our site. Why trust us?

How I repurposed an old Raspberry Pi into a travel router
Spring Break 2022. It was my first real opportunity to travel in exactly two years, after a little thing called a global pandemic scuttled a family trip to (of all places) China. You lose a lot of road warrior muscle memory in that time. What to pack, and how to pack it. Dealing with airports and other travelers.
The background
But first, we move the pi-hole, building a travel router, so, was any of this worth it.
But it also was a chance to reassess and take stock of how I travel. And one fix this year was going to be including a travel router.
Why? I’m growing more conservative in my old age, and that means worrying more about my (and my family’s) online security not just at home , but also on the road. And that means no more connecting to an Airbnb host’s network, at least not directly. Same goes for hotels.
- Watch this developer use a Raspberry Pi to revive a guitar amp
- Raspberry Pi celebrates its eighth birthday with a serious price cut
So it was time to finally figure out a travel router. Here’s how I did it.
While there’s no reason that I couldn’t have just bought some sort of travel router and called it a day, I didn’t want to spend a couple hundred dollars (or more!) on what ultimately would be going to a company’s marketing budget more than anything. This is the sort of thing that a Raspberry Pi is perfect for.
Only one problem: As of mid-April 2022, due to supply chain issues , it’s still pretty impossible to buy a new Raspberry Pi. At least not without paying a pretty stupid premium online.
For the uninitiated, a Raspberry Pi is a tiny little Linux computer that fits in the palm of your hand. It’s powered by USB-C, which almost everyone should have on hand already, and it uses a microSD card for onboard storage. And the operating system is open source, which means you can do all sort of fun things with it. And you don’t have to have a neckbeard to rock Linux. You just have to be able to search for things on the internet, and copy and paste commands — and have a little patience and the willingness to screw up once or thrice.
I already have a couple Raspberries Pi (that’s the non-official plural that I’m still trying to make happen) in use in my home. One is attached to an antenna that helps track airplanes. It’s also running an ad-blocker across my entire home network. The other was being used as a bridge between all our smart devices. So things like Nest cameras and thermostats — which don’t play nice with Apple HomeKit — can work just fine with Apple’s built-in smart home hub. But that’s the less important of my Pi. I don’t really care that much about HomeKit.
And so after a couple weeks of hunting and waiting, I gave up and decided to do what any self-respecting nerd would do. I cannibalized gear I already own and gave up the luxury of being able to see when my front door unlocks as an Apple notification and instead will have to put up with seeing it as a Nest notification. The horror.
Actually, this is the part where I have to admit that I forgot which Raspberry Pi was doing what, and actually unhooked the wrong one to turn into a travel router. I thought I was sacrificing the Pi-hole ad-blocking box , and decided it was time to move it over to the network-attached storage that also resides in my living room and is woefully underused.
Most of the time it’s doing just what its name implies — serving as storage. But it can do so much more than that, including acting as a server. After a couple minutes of searching and a few more of actually setting things up, I fired up Docker on the Synology NAS, installed Pi-hole there, and pointed my router to it.
It’s like nothing changed at all. And because I got really smart and backed up the ad-blocking lists from the other Pi-hole instance, which is now doing precisely nothing, it literally is the exact same thing, just in a different network location. The ads are still blocked across my network, it’s just that they’re blocked form a different CPU. And my family is none the wiser. (I told them what I did, and got the blank faces that denote a job well done.)
went with a $20 case
another $12 for a Wi-Fi antenna
So $12 (or $32) for the full project — that’s far better than buying some company’s router.
I’m not going to go step-by-step through the full project. But I will link you to the broad strokes.
I’m a nerd, but I’m one who still needs a good bit of handholding when it comes to Linux.
The operating system itself is OpenWRT . Open, as in free, as in beer (which isn’t really what “open” means, but whatever), and WRT, as in Wireless RouTer. It’s a free, open-source operating system that turns whatever you’ve installed in on into a customizable router. Very cool.
OpenWRT also plays nicely with any number of VPNs, via OpenVPN. So I made sure to install that, too, given that being able to securely connect to the internet while on the road was the point of this whole little project. You’ll need a VPN provider, of course. ExpressVPN and NordVPN are two of the more popular ones out there — I pay for ProtonVPN for my personal use. The process is pretty much the same either way.
I’m a nerd, but I’m one who still needs a good bit of handholding when it comes to Linux. So the free Network Chuck tutorial is what got me through this whole process. I don’t mind admitting that it took a few tries to get it right — but that’s on me. It’s an excellent tutorial on a not-uncomplicated process.
And while we’re at it, might as well throw in some ad-blocking again. (There’s nothing more jarring than leaving your house and being reminded just how awful the internet is these days.) Only instead of Pi-hole, this time I went with AdGuard . Same price (free!) and the same basic premise: The network requests of any device connected to the travel will go through AdGuard first, and it’ll squelch anything it deems bad. Like ads. Or other things.
The whole build took a couple hours, mostly because I actually went through it twice, to make sure I got things right and dialed in just how I wanted them to be. It took about $32 in new parts, but that could be less if all you need is the Wi-Fi antenna.
The important part is that when I’m on the road, I can now control the route all my devices take to the internet. I don’t have to worry about connecting my phone and my laptop and my tablet individually to a VPN — I can just connect them all to my fancy new travel router. Same for my family. I don’t have to worry about what else some landlord may have on that same network. Or what a hotel’s network might be up to. (I honestly can’t decide which is worse.)
And I’ll once again have the added bonus of blocking ads and other trackers while I’m on the road. It’s not as fast or powerful as my full mesh system at home, that’s for sure. But it’s far less expensive, and much more secure than nothing.
Not bad for a little Linux computer that you can’t even buy right now.
Editors’ Recommendations
- This custom hoverboard is entirely powered by Raspberry Pi
- You can now cram your Raspberry Pi 4 with 8GB of RAM for $75

AMD’s Ryzen 9000 series is facing a challenging reception in the desktop CPU market. Just over a month since its release, new reports indicate that the Ryzen 9000 series has experienced low sales, making it one of AMD's most disappointing launches since the ill-fated Bulldozer architecture in 2011.
This downturn has significant implications for AMD's fight against Intel, especially given the momentum it gained with its previous Ryzen generations. Retail struggles and global impact Retailers across various regions are reporting poor sales numbers for the Ryzen 9000 series. For instance, TechSpot reports that Australian retailers have described this as the worst Ryzen launch since AMD first introduced the brand. Sales were so low that some stores reported single-digit figures for units sold within the first few weeks.
Intel is getting rid of one of the features that has defined most of the best processors for more than a decade -- Hyper-Threading. It's the branded name Intel uses for simultaneous multi-threading, or SMT, and the company has already confirmed it won't use SMT on its upcoming Lunar Lake mobile CPUs. Rumor has it the company is also ditching SMT for its Arrow Lake desktop CPUs. Surprisingly, according to new leaks, killing SMT might have been the right call after all.
A handful of benchmarks have leaked for Arrow Lake CPUs. Starting off, the Core Ultra 7 265K and Core Ultra 9 285K both popped up in the Geekbench 6 database. The flagship Core Ultra 9 is a 24-core part, and it achieved a score of 21,075 in Geekbench 6's multi-core test. That's slightly above what you'll see with the Ryzen 9 9950X and on-par with the Core i9-14900K, both of which come with 32 threads due to SMT.
Apple Intelligence is Apple's take on AI, and it looks to fundamentally change the way we interact with technology, blending advanced machine learning and AI capabilities into everyday devices. Promising more conversational prose from Siri, automated proofreading and text summarization across apps, and lightning-fast image generation, Apple's AI ecosystem is designed to enhance user experiences and streamline operations across its product lineup. Here's everything you need to know about Apple's transformational new AI.
Apple Intelligence release date and compatibility Apple Intelligence was originally slated for formal release in September, coinciding with the roll out of iOS 18, iPadOS 18, and macOS Sequoia. However, as Bloomberg's Mark Gurman reported, Apple subsequently decided to slightly delay the release of Intelligence. It is currently available to developers, though it's looking unlikely that Apple Intelligence will be released publicly before the 18.1 roll out scheduled for October, per Gurman. https://twitter.com/markgurman/status/1817632719175901531 The company has specified that, at least initially, the AI features will be available on the iPhone 15 Pro and 15 Pro Max, as well as iPads and Macs with M1 or newer chips (and presumably the iPhone 16 handsets as well, since they'll all be running iOS 18). What's more, the features are only available at launch when the user language is set to English. Why the cutoff? Well, Apple has insisted that the processes are too intensive for older hardware, as they utilize the more advanced neural engines, GPUs, and CPUs of these newer chips. Users who run an iPhone 15 Pro or iPhone 15 Pro Max part of Apple's Developer program gained access to an early version of Intelligence in July with the release of iOS 18.1 beta.
Turn your Raspberry Pi into a Travel Router
In this guide, I will show you how I turned my Raspberry Pi 4B into a palm-sized travel router using OpenWRT!

I am on the road a lot and I want to stay connected, but I also to keep my internet traffic hidden from potentially malicious actors. I figured it was time for me to look into buying a travel router such as the GL.iNet GL-AR750S-EXT . While this is an affordable and more convenient option, I wanted to work with what equipment I already had. This made my Raspberry Pi 4B perfect for a DIY spin on a full-fledged travel router!
What you’ll need:
To get started building your Raspberry Pi travel router, you will need:
- Raspberry Pi (I recommend a Raspberry Pi 3 and above)
- A single USB WiFi adapter (you will need two adapters if you are using an older model with no built-in WiFi)
- A microSD card (32GB or above is recommended)
- SD card reader
- Power supply for Raspberry Pi
- puTTY (or a ssh client of your choosing)
- Ethernet cable
Step 1: Install OpenWRT
Navigate to the OpenWRT website and find the firmware for the Raspberry Pi you will be using. Make sure you install the Firmware OpenWrt Install URL → this comes with the GUI/LuCI pre-installed, ready to go.
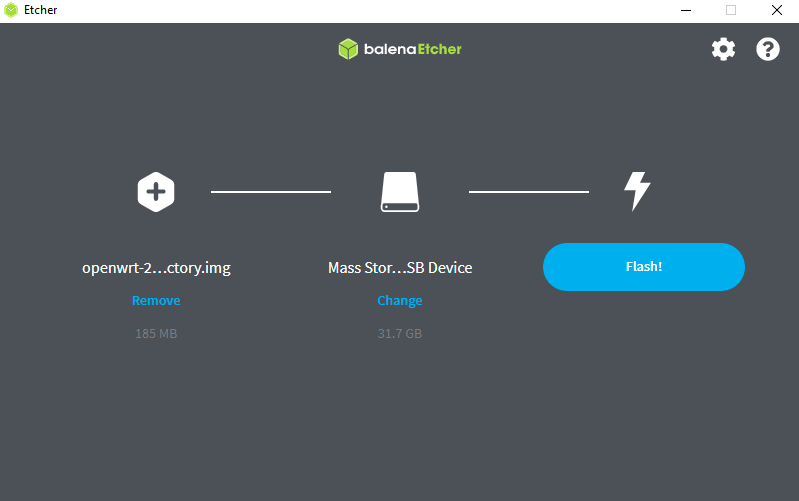
Extract the downloaded file and flash it to a microSD card using balenaEtcher or Rufus.
Once the flashing process is done, eject the microSD, put it into your Raspberry Pi, plug in your ethernet cable, and boot your Raspberry Pi.
Step 2: Initial Configuration
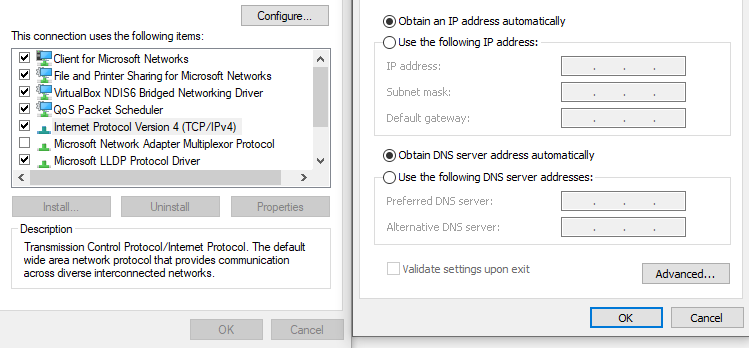
By default, OpenWRT assigns 192.168.1.1 as the static IP address. This is also the default gateway for many routers. The default IP address did not conflict with my home network configuration and I was able to leave it as is. If this is an issue for you, you can set a static IP address before you ssh into your Raspberry Pi by navigating to Control Panel>Network and Internet>Network and Sharing Centre>Ethernet>Properties>TCP/IPv4 .
We will be doing the initial configuration in the command-line interface rather than using LuCI, OpenWRT’s web interface. However, you can type 192.168.1.1 (or the static IP that you set) into your web browser and do all of the following configuration changes in LuCI.
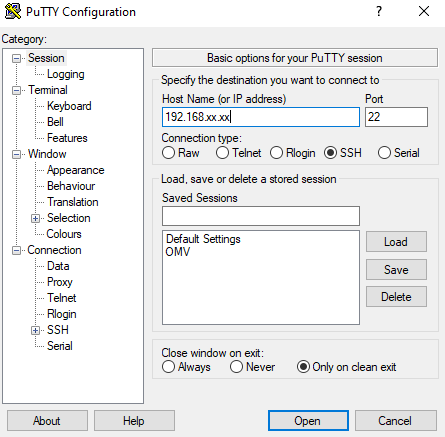
Open up puTTY and load your Raspberry Pi’s IP address into the Host Name (or IP address) field and hit open to initiate the SSH session.
Once you have established the session, sign on with the default username root .
Now, we need to change the default password by typing in:
Configuring Network and Firewall
We need to make changes to the network and firewall files on the Raspberry Pi. To do this, we need to change directories using the following command:
In this directory, you will see some of the files that we will be making edits to such as network, firewall, DHCP, system, wireless, etc.
We will be using vim, a screen-based text editor program for Unix until we can install nano. Use the following command to edit the network file:
Once you open the network file, you will notice it is locked. You need to press the “ i ” key on your keyboard to enter insert mode in vim.
We are going to make changes to the lan interface in the network file, add a wwan interface, and add DNS servers. Make sure the following changes are made to the network file:
You can save the file and exit the text editor by pressing the escape , : ( colon ) followed by wq , and enter .
In the same /etc/config directory, we are going to make edits to the firewall file with the following command:
We are making only one edit to the firewall file and it lies under the wan zone. Make sure your edits match the following code:
All of our edits are now saved and we can type reboot and wait for the Raspberry Pi to reboot with the new IP address 10.77.77.1 .
Step 3: Configuring OpenWRT Network
Next, we need to update OpenWRT. In order to do that, we need to enable the Raspberry Pi’s built-in WiFi by editing the wireless file in the /etc/config directory.
Use the following code to make changes to the wireless file:
Do not forget to press escape , :wq , and enter to save edits and escape the text editor.
Now, we need to apply our configuration to the wireless interface by using the following command:
Grab your mobile device, scan wireless networks, and you should see the SSID OpenWrt being broadcasted!
Connecting OpenWRT to WiFi
We are now going to shift to OpenWRT’s LuCI interface to make the rest of our configuration changes.
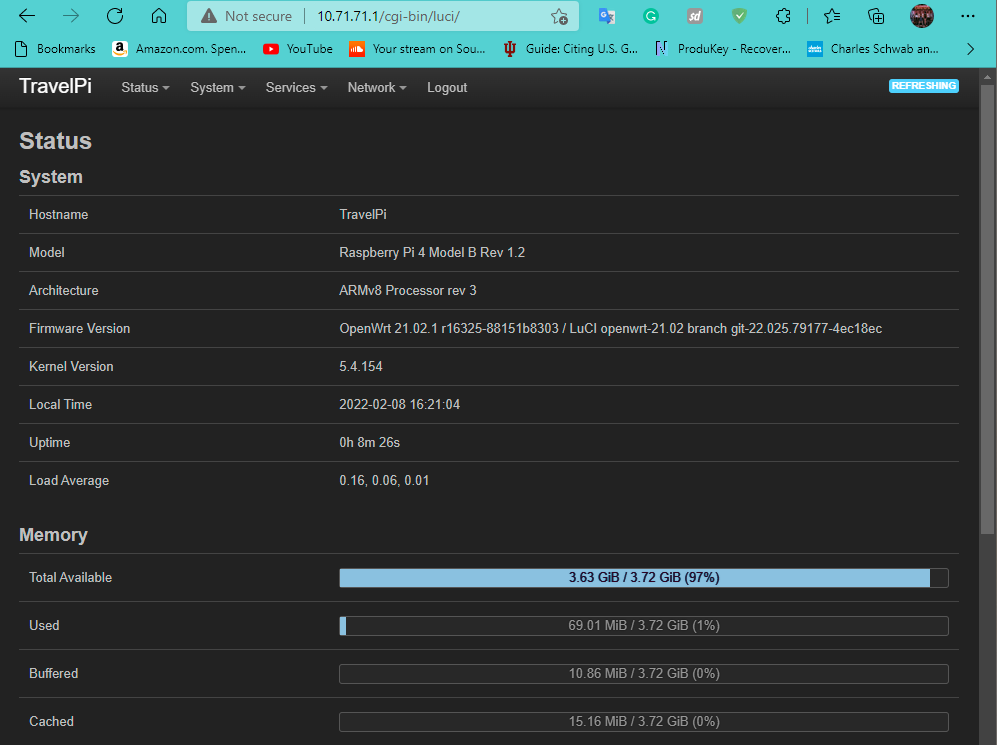
Navigate to your browser and enter the IP address of your Raspberry Pi. Log in with your credentials and you should see a menu similar to this.
Go to Network > Wireless , you will see radio0 , the Raspberry Pi’s built-in WiFi, and the SSID will default to OpenWrt. You will not see radio1 until we set up the USB WiFi adapter.
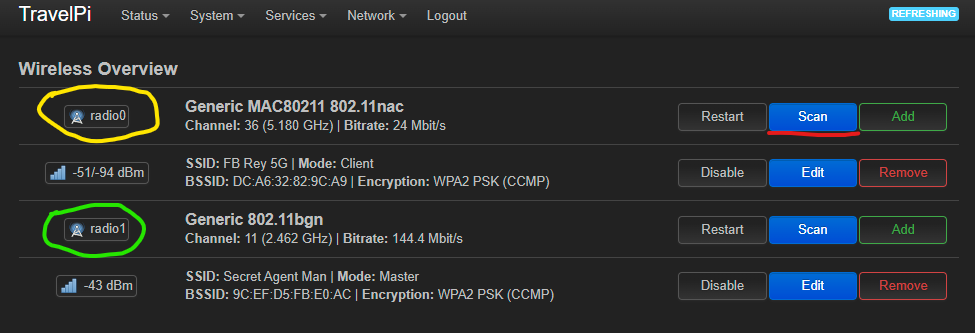
On radio0 , scan for all available networks and connect your Raspberry Pi to your home network to grant it access to the internet.
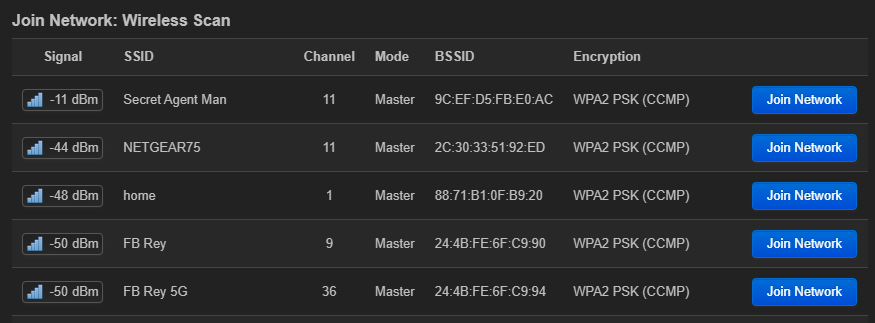
Note : You will do this exact same process anytime you are at a coffee shop, hotel, or any public WiFi network you want to connect to. The Raspberry Pi acts as a client that connects to any open wireless network you have access to at the time.
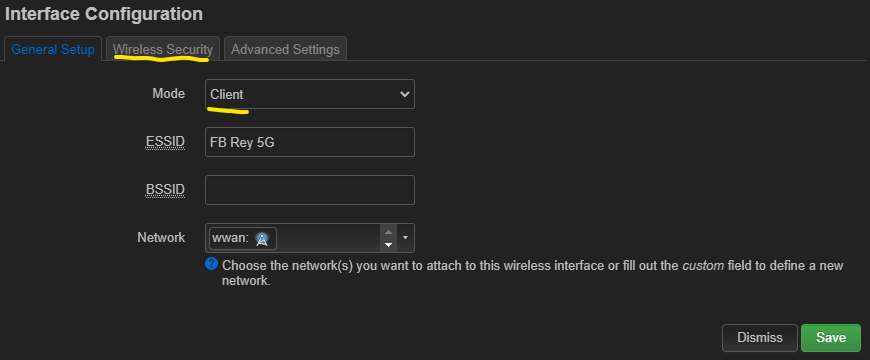
In your interface configuration, setup radio0 by ensuring the following:
- Mode is set to Client
- SSID matches the network you want to connect to
- Network is set to wwan
- Under Wireless Security, enter the passphrase to the network
- Toggle the box that says “Replace wireless configuration”, and save your edits.
Press “Save & Apply” at the Wireless Overview screen to save your edits and your Raspberry Pi should now have access to the internet.
Setting Up USB WiFi Adapter
The additional USB WiFi adapter acts as an access point for you to connect your personal devices. I would refer to this guide that goes into detail with a list of USB WiFi adapters that work best for specific applications. I personally used the Panda PAU06 USB WiFi adapter and it worked straight out of the box with speeds close to 300Mbps. I also attempted to use the TP-Link Archer series of USB WiFi adapters, but I could not get them to work with the drivers on OpenWRT.
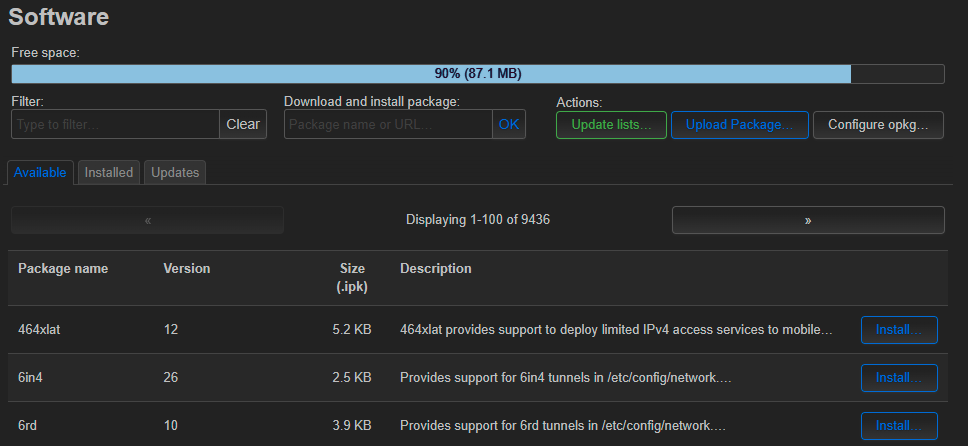
We are going to navigate to System > Software and update the OpenWRT packages using the Update lists action button. A script will run that will determine the packages that need to be updated and you can install them by going into the Updates tab.
You can also do this by running the opkg update command over ssh.
Next, we will are going to install the USB WiFi adapter drivers along with nano, an easier-to-use terminal file editor. I did some research beforehand and found that the Panda PAU06 uses the Ralink RT5372 chipset which coincides with the rt2800usb modules in OpenWRT.
I recommend using puTTy to install the drivers; however, you can also search each driver in the Software page of LuCI and install each module individually. Use the following code to install the drivers for the Panda PAU06 or similar adapters that use the same chipset.
If you do not know your chipset/driver information, use the following code to download the drivers for general USB devices.
Plugin your USB WiFi adapter into your Raspberry Pi and check if the adapter was recognized by running the lsusb command.
If the lsusb command shows your USB WiFi adapter, the adapter has been successfully recognized and registered by OpenWRT. If it does not show your adapter, you may need to double-check the driver modules you installed or install additional drivers. Refer to the user manual or documentation that came with your wireless adapter.
Now that you see your USB WiFi adapter, we need to activate the adapter using the following command:
Step 4: Setting Up WiFi Access Point
Return to the LuCI dashboard, navigate to Network > Wireless and you should see your USB WiFi adapter labeled as radio1 .
Set up your adapter by pressing “Edit” and make the following changes:
- Mode is set to Access Point
- Set the SSID to a network name of your choosing; default is Openwrt
- Under Wireless Security , set Encryption to WPA2-PSK.
- Set a strong password, write it down, and store it in a secure place.
- Save and apply your edits
You should now have two running WiFi connections, radio0 as your built-in WiFi, and radio1 as your access point. At this time, try connecting to your access point with a mobile device or computer to confirm that it is operational.
If it works, you can disconnect your ethernet cable.
You should now have a functional travel router! There are a few things I want to mention before we finish.
- Download and install the Travelmate software on your travel router. This allows you bypass captive portals at hotels and coffeeshops that will sometimes block you from establishing a connection.
- You can also do a VPN travel router and I recommend you check out NetworkChuck’s video for configuring a vpn client.
- If you don’t want to configure the vpn client on OpenWRT, you can install your VPN providers profile on your personal device and toggle it after you have connected to your travel router.
- OpenWRT has a plethora of software that you can pair with your travel router such as Wireguard, Ad-blocking software, etc.
Leave a Comment Cancel reply
Save my name, email, and website in this browser for the next time I comment.
- 3Drag 3DPrinter
- >> Go to Store
- makeITcircular 2024 content launched – Part of Maker Faire Rome 2024 Posted 2 months ago
- Application For Maker Faire Rome 2024: Deadline June 20th Posted 4 months ago
- Building a 3D Digital Clock with Arduino Posted 9 months ago
- Creating a controller for Minecraft with realistic body movements using Arduino Posted 9 months ago
- Snowflake with Arduino Posted 9 months ago
- Holographic Christmas Tree Posted 10 months ago
- Segstick: Build Your Own Self-Balancing Vehicle in Just 2 Days with Arduino Posted 10 months ago
- ZSWatch: An Open-Source Smartwatch Project Based on the Zephyr Operating System Posted 11 months ago
- What is IoT and which devices to use Posted 11 months ago
- Maker Faire Rome Unveils Thrilling “Padel Smash Future” Pavilion for Sports Enthusiasts Posted 12 months ago
Feel Free To Travel Around the World With Your Raspberry Pi Secure Travel Router

Would you write your password on a piece of paper and stick it to your forehead? Probably not. Yet connecting to a public Wi-Fi network is almost as foolish. You might not have any choice, however, if you’re on the road and want to stay connected. A VPN can keep you safe, but each device has to connect separately, unless you’re using a travel router as a go-between. Don’t have one handy? Don’t worry, you can build one with a Raspberry Pi. It’s the perfect choice for a DIY VPN travel router, so let’s walk you through how to build one.
Published by Ben Stockton, this new Raspberry Pi project features a Raspberry Pi Zero W or a larger Raspberry Pi 3 mini PC depending on your requirements and budget.
On software side, instead of a standard Linux distribution, he suggests to install OpenWRT onto an SD card to turn it into a fully fledged router. Other Linux distro can be used if you prefer, but “OpenWRT provides a handy web interface for configuration when you’re away from home,” he says.
All you need for this project is:
– Raspberry Pi (Pi 3 or Raspberry Pi Zero W preferred) with case – A single USB Wi-Fi adapter (two, if you’re using an older Raspberry Pi) – A microSD card with at least 8GB storage – An SD card reader – A high-quality power supply – PC with an SSH client installed – A VPN subscription with OpenVPN support
Further information about this Raspberry Pi VPN-secured travel router are available on makeuseof.com .
See also the CyberGhost Review .

About Luca Ruggeri
Related posts.

Your email address will not be published. Required fields are marked *
OpenSource Products
Color camera module equipped with a 1/3″ CCD sensor and...
- Posted 3 months ago
ESP32 Low Power Module, based on Espressif’s SoC capable of...
This power supply latch provides power to the external circuit...
Two-way remote control system, based on the GSM/4G A7682E module...
- Posted 4 months ago
This kit creates a microphone amplifier with an output suitable...
- Posted 9 months ago
It is capable of recognizing the sound of clapping hands...
- Posted 12 months ago
This monitoring device is useful for keeping track of the...
This LED candle with breath-activated ON/OFF function draws inspiration from...
Getting to know and evaluate the software offer for PCB,...
- Posted 3 years ago
A sensor converts data such as heat, light, sound,...
- Posted 4 years ago
This article is a getting started guide for the ESP32...
- Posted 5 years ago
Mods and Hacks
Based on Neopixel and a special ultra-thin Arduino, it simulates...
Here we are, eventually the contest has come to an...
- Posted 10 years ago
Roland Hoffert, from www.eytec.de, submitted us this 3Drag (Velleman K8200...
Karl Seiss from Austria made a very clever hack to...
The screen you are looking at this very moment will...
On March 11, WHO (World Health Organization) officially declared the...
The moment we are living, in China before and all...

We use an Arduino to program other ATmega without...
- Posted 13 years ago

This is a very low...
- Posted 14 years ago

The device is based on a GSM/GPRS module with...
- Posted 12 years ago

Shield for Arduino designed and based on the module...

Some post ago we presented a PCB to mount...

Applications to MakeITcircular must be in by October 3,...
- Posted 2 months ago

Color camera module equipped with a 1/3″ CCD sensor...

ESP32 Low Power Module, based on Espressif’s SoC capable...

This power supply latch provides power to the external...

Learn More About the Ideas, Makers + Projects at...
Open-Electronics.org is the brainchild of a world leader in hobby electronics Futura Group srl . Open-Electronics.org is devoted to support development, hacking and playing with electronics: we share exciting open projects and create amazing products!
Open-Electronics.org is not just a container of ideas: it is also a web site lead by a team of engineers and geeks who will take part in the discussions and give support.
Our mission is to become a reference Open Source hacking site with ideas and feedback aimed to enrich the community.
Advertise with Open Electronics
For all the detailed offerings you can download the media kit if you are interested in advertising your activity on Open Electronics . To get in touch with us or if you want a customised offer, you can write us using the Contact Form . More Info
License and Privacy Policy
The Articles you can find on Open Electonics are licensed under a Creative Commons Attribution-NonCommercial-ShareAlike 3.0 Unported License . Where not specified differently, design files and source code are instead provided according to a Creative Commons Attribution-ShareAlike 4.0 Unported License .
Privacy Policy
Copyright © 2020 Open Electronics
Building an encrypted travel wifi router
This article is about building a secure travel wifi router using a RaspberryPi and the Wireguard VPN protocol. It is a long and technical article describes how I stopped worrying about untrusted and insecure wifis in hotel rooms and conference venues.
The Problem
I travel a lot and therefore often rely on wifi provided in aircrafts, hotels or conference venues. Unfortunately, the state of security of those uplinks is worrying, connections are often buggy and rarely encrypted. A WPA2-protected wifi with pre-shared key (PSK) does not provide individual security. Everyone knowing the password can easily eavesdrop on all the traffic, not just their own. Only few sites offer more secure wifi, e.g. facilitating WPA enterprise and individual accounts.
Why don’t I just use a VPN on my devices then? Well, first I carry quite a few devices, and not all of them are capable of running a modern VPN. Secondly, some of them can not handle IPv6-only VPN connections. That’s a show stopper for me. Furthermore, many hotspots are protected by a captive portal that requires me to login to the portal on every device before I can establish a VPN tunnel. Given that I am allowed to connect more than one device at all. Even worse, some captive portals require re-authentication every 12 or 24 hours or whenever a devices re-enters the area of wifi coverage. The most important reason why I avoid using on-device VPN termination whenever possible is that devices can easily be tricked to circumvent the VPN connection for some traffic. The most harmless threat being DNS leakage, but more sophisticated attacks include fake proxy configuration, rogue routers and all sorts of MITM attacks on HTTPS and other protocols.
The Solution
I tried many different approaches to face the problem over the last couple of years.
Here are my findings on what a sufficient solution should be capable of:
- Provide a private, secure wifi for my devices.
- Private data passing the untrusted wifi must be encrypted.
- Do not leak any data from inside the secure wifi.
- Mitigate most common attacks by not trusting the untrusted wifi’s link layer at all.
- Provide a way to quickly (re-)authenticate on captive portals.
- On the untrusted wifi, act like any other of-the-shelf device. Appear to be normal :)
May I proudly present the current iteration of my solution:

Let’s go through the above network diagram from the bottom up. At first, we have the devices we want to securely connect to the Internet. That is, for example, a notebook, a phone and another random gadget. They join the private wifi provided by private router . The private router encrypts all traffic that is headed towards the Internet using a VPN. The encrypted traffic is then routed through the untrusted wifi (e.g. an open hotel wifi) via the access device . This can be a cheap smartphone or a pocket router. I strongly suggest using something with a screen and a browser, because the access device not only has to provide an attack-free link to the private router, but also needs to authenticate to all kinds of weird captive portals. Android 6.0 with automatic security patches is a good idea and has successfully been tested with this setup. For providing the uplink for the private router I recommend USB tethering. Not only does the USB cable charge the access device, it also provides enough freedom to place it somewhere where the untrusted wifi signal is strong.
We gain a security benefit from using a dedicated access device for shielding the untrusted wifi’s link layer from the private router. Sadly, many untrusted wifis are legacy-IP only, in such environments we pay for the benefit with an additional layer of NAT. However, more firewalls are better they said, right?
Back to topic: Once the encrypted traffic worked its way from the private router via the access device, through the untrusted wifi it finally reaches the Internet. Which, of course, we don’t trust either, although most of our packets from the private wifi will end up there eventually. Encrypted traffic finally hits the VPN server where it will be decrypted and routed properly (read: released into the wild, wild Internet).
Too abstract? Here are two possible setups for clarification.

The photo above shows a mobile phones being used as the access device for the private router.

Here I used a small OpenWRT router as access device for a wired, but untrusted network. I could have connected the private router directly to the wired network if it was a bit more trustworthy.
Let’s start tinkering! The remainder of this article describes a setup that
- protects agains eavesdropping on the untrusted wifi,
- circumvents device limits in the untrusted wifi,
- shields your devices from typical attacks against VPNs on the link-layer of the the untrusted wifi,
- and gives you access to the whole Internet in locations where they only have legacy IP and/or censorship.
Requirements
- A small linux-capable computer with integrated or attached wifi hardware, preferably a RaspberryPi . This will become the private router.
- A server, preferably a dual-stacked virtual instance running Debian Linux Jessie. This will become the VPN server.
- A spare Global Unicast /64 that is routed to the VPN server. We will use this prefix on the private wifi.
- A smartphone, preferably running a recent version of hardened Android. Beware of super-cheap devices, some of them perform terribly when running in tethering mode. You have been warned!
- Basic understanding of IP routing, policy routing, packet filtering and Linux CLI
- No fear to compile a Linux kernel module. Scared? Don’t be, it’s not that hard, really!
- Endurance, as this is not a 10 minute project, but it’s worth it!
Brief overview of what we are going to do:
Recursive, validating DNS
- Private wifi
Caching DNS Forwarder
Legacy ip (optional).
- Connect access device
We want our addressing to be close to the one shown in the following graphic, just with different numbers of course:

For the in-tunnel addressing, basically a point-to-point connection, we use Unique Local Addresses (ULA). I strongly suggest generating an individual pseudo-random RFC4193 prefix out of fc00::/7 . Use this fancy online tool from our friends at SixXS to generate yourself your very own prefix! I’ll be using fd12:3456:7890::/48 for the remainder of this article. Please replace those addresses accordingly.
The private wifi uses a slice of your Global Unicast prefix, whatever this may be. I happen to have a /48 prefix, but heard from others that they got even bigger chunks from their registry. No worries, a single, routable /64 is sufficient!
The VPN server
- takes care of routing the private wifi prefix through the tunnel to the private router,
- encrypts all packets entering the tunnel (from the Internet to the private router),
- decrypts all packets leaving the tunnel (from the private router to the Internet), and
- acts as a first line of defense for unwanted packets from the Internet.
We start with a fresh install of Debian Linux Jessie, for example on a small VM in a datacenter. Then we configure network connectivity, backup service and basic filter ruleset to our personal preferences. You probably have your own deployment and configuration method and tools, so I refrain from bugging you with basic system administrator tasks and just trust your workflow. At this point you should have the machine ready to be accessed via SSH and know how to gain superuser privileges.
Wireguard is a new, promising VPN protocol. After many years of working with OpenVPN, L2TP, IPsec and even SSH as VPN, working with Wireguard feels just awesome. It is simple, extremely reliable and it just works.
Here’s how the creators define their protocol:
WireGuard is an extremely simple yet fast and modern VPN that utilizes state-of-the-art cryptography. It aims to be faster, simpler, leaner, and more useful than IPSec, while avoiding the massive headache. It intends to be considerably more performant than OpenVPN.
As Wireguard is an in-kernel VPN implementation, it is either already part of your favorite distribution or you have to build it from source. We are using Debian Jessie on the VPN server, which means we have to install a backported kernel and build the Wireguard kernel module and userspace tools.
Add this line to /etc/apt/sources.list :
Then update the package list, install the latest kernel and reboot:
Now we need some headers and tools:
Now it’s time to grab a copy of the source and compile it.
If everything went well, we can install the module and tools:
With modprobe wireguard we load the module into the running kernel. By adding a line reading wireguard to /etc/modules the system does this automatically after the next reboot.
Head over to the Wireguard website and browse through the documentation to make yourself comfortable with the concept. Wireguard is a crypto-routing, in-kernel, device-based VPN technology. If you have a hard time understanding what this means, consider giving the documentation another shot. It took me a while to grasp how nice and fancy the approach is compared to other VPN technologies. Especially, if one plans to establish mostly static routes, like we will in the upcoming sections.
I assume we are all set and ready for our first Wireguard tunnel? Let’s do it!
First step in asymmetric cryptography is always to generate a key pair. We do this by creating a private key and then deriving a public key from it. Wireguard’s own userspace tool wg takes care of this:
The first key pair is meant to be used for the server. To proceed with this article, we need the router’s public key, so we will generate the key pair right now:
I usually suggest storing the key pair only on the same system on which it is used. Please transfer the private key securely to the private router later and remove it from the VPN server (e.g. use shred ).
This should leave us with two files for the server and another two files for the private router. They contain the VPN server’s private and public key. Make sure you don’t confuse these two! The tunnel won’t work if the private and public keys of the endpoints are not correctly distributed!
The tunnel endpoint will be the wg0 interface, which we need to configure. I prefer using the config files instead of the very long CLI commands of wg . So, here is the first part of the /etc/wg0.conf file:
We usually don’t run services on privileged ports unless necessary, and yet here I am using port 500. Why is that? Well, my argument goes like this:
- This is an in-kernel VPN protocol, so opening port 500 does not require any additional capabilities to the ones the kernel already has. Which is ALL THE CAPABILITIES :)
- UDP port 500 is commonly used for IPSec, which increases the chances that this port is not blocked in an maybe restricted wifi.
The second part of the /etc/wg0.conf file looks like this:
What may be confusing when done the first time is the AllowedIPs directive. Let me go into detail here, as it is essential for secure crypto-routing that we filter for source addresses. When a packet enters the tunnel, it gets encrypted and becomes the payload of a Wireguard packet , which itself is the payload of a UDP datagram which in turn is the payload of an IP packet. For the sake of simplicity, let’s ignore the UDP header for a moment, as it does not add any value to the discussion.

So, we have our Wireguard packet coming in from another endpoint, and the payload is the original IP packet. Without AllowedIPs , we would decrypt the payload, thus get the original packet, and route it according to our routing table. How could we know the source address of the original packet wasn’t spoofed? Do we trust our endpoint that much? Probably not! This is why we put some restrictions on the original packet’s source address using AllowedIPs . Even if the encrypted packet authenticates and decrypts properly, we would not route it unless its payload (read: the original packet) came from within an allowed prefix.
Now it’s time to tell the system to bring up the wg0 interface on boot. A quite convenient way is adding a corresponding section to /etc/network/interfaces :
This creates the interface using ip (a userspace tool for the kernel’s RTNETLINK API). The interface, however, will still lack some essential information, e.g. IP address and Wireguard-specific configuration data. The IP address can be set using ip even before the interface comes up:
And we can also apply the /etc/wg0.conf configuration file while the interface is still down:
The next directive actually brings up the interface we just configured:
We can also explicitly allow IP forwarding on the new interface. This step may or may not be required, depending on your sysctl.conf settings.
It is good style to remove the wg0 interface on shutdown. That may also prevent hard to debug errors in some cases.
The complete section looks like this:
Remember to set appropriate file permission for all files containing private key data! From now on, the wg0 interface should come up right after the system boot. Why don’t you try it out now?
At first, we have to globally enable routing by setting the corresponding variable in /etc/sysctl.conf :
After that we apply the change:
The next step is to add routes for the private wifi, because devices in that network will want to receive packets via the VPN tunnel. There are plenty of places where routes may be set up. On Debian-based distributions I prefer to add the routes when the related interface comes up. That’s best done using the post-up directive in /etc/network/interfaces :
That’s it for routing on the VPN server. The rest will be taken care of by the default and interface routes. Easy, wasn’t it?
The Domain Name System (DNS) is an essential part of connectivity. Inside the private wifi we want a DNS server that
- responds fast,
- validates resource records,
- does not make excessive use of the maybe limited hotel wifi bandwidth, and
- prevents DNS leaks to protect our privacy.
To have a fast response time, the DNS server should cache results from previous queries, serving them directly from the private router to the connected clients. The DNS server on the private router must not resolve recursively, as it can produce a lot of back and forth traffic. Bandwidth and latency may be suboptimal in the typical hotel wifi situation. Validating resource records can be done by using DNSSEC, but adds some extra data that needs to be fetched.
I came up with this diagram to solve the problem:

This DNS setup uses two DNS servers, one on the private router and another one on the VPN server. It has the nice advantage that we can run the bandwidth-heavy, latency-critical and computing operations on the server, which is expected to be better connected and also more powerful than the private router. The on-server DNS instance takes care of resolving recursively, validating and some caching, the local DNS server on the private router just forwards queries and caches the responses. Since the connecting between these two DNS servers happens to be inside the tunnel, we consider the responses from the recursive server trusted (as in: not modified during transit, no need to run DNSSEC again). The tunnel also prevents DNS leakage.
To install the DNS daemon on the VPN server just run:
The configuration file /etc/unbound/unbound.conf I used looks like this:
This configuration tells unbound to listen on any interface, but to only allow queries from localhost ( ::1 ) and the private router via VPN ( fd12:3456:7890::2/128 ). Modify the file according to your addressing scheme. Then start the daemon by running:
To test the setup just run a query against the server:
The answer should contain ad flags, look for something like this:
If everything is fine, we enable the DNS daemon permanently:
Let me say a few words regarding filtering first: Filter rules are constantly evolving as new attacks and threats appear or protocols develop. Proper filter rule management is therefore a must-have for all systems we are responsible for. Furthermore, filter rules are not pure science but are also highly influenced by what one considers best practice. I have seen many well-thought-through filter rule sets, but I rarely see two that are the same. This leads me to the conclusion that filtering is sometimes more art than science and everyone has personal preferences on how rules should be ordered or look like. I will assume that you set up your own basic filtering right after you installed the operating system and that you know best how you want to manage your rules. That said, we will only discuss rules here that are specific for the problem we are solving. You are expected to add the discussed rules to you existing rule set where you think they are placed best.
If you already have connection tracking in place, please skip the next rule. Otherwise just add the following rules to the INPUT and FORWARD chains at a very early stage.
We have to allow incoming Wireguard packets, remember port 500?
I suggest putting this rule in the legacy IP filter as well. It will allow the tunnel to operate on legacy IP, which is often the only protocol that is available in some places. As of 2016, the market penetration of state-of-the-art IP in hotel and venue wifis is still shamefully low. We have to do better, folks! But that’s another (long) story…
We run a recursive DNS service on the VPN server to provide validated resource records (RR) for the private router. We should allow the private router to talk to the DNS service to make them work:
On a side note, if TCP port 53 sounds odd to you, it is well inside the bounds of specification. It wasn’t used widely during the legacy IP era and before DNSSEC became (somewhat) popular.
To make life a bit easier, especially when debugging, we allow forwarding of packets that stay in the tunnel (if they hit the VPN server at all).
Finally we want to allow forwarding of packets from the private wifi to the Internet.
That’s it from filtering for now.
Private Router
The private router provides the private wifi and acts as the client side of the tunnel.
I chose a RaspberryPi 3 as hardware platform for the private router, because it has a built-in wifi chip. Other platforms work well, too. I had this setup working on much smaller devices, too, e.g. an OpenWRT-capable router of the size of an USB thumb drive.
For the operating system I used Raspbian Lite as provided by the RaspberryPi Foundation. To operate, the private router needs an uplink, which can be provided either via Ethernet or USB tethering. Therefore we configure the corresponding interfaces to automatically gain connectivity. We add the following lines to /etc/network/interfaces :
The Wireguard installation is quite similar to the one we performed on the VPN server:
Again, consider adding a line reading wireguard to /etc/modules .
We will configure the private router’s end of the tunnel, the wg0 interface, using a configuration file ( /etc/wg0.conf ):
The ListenPort directive has a sometimes misleading name. Wireguard allows configurations that mock the more common client server model. In that case, ListenPort on the client becomes the source port of outgoing packets. Technically, the Wireguard module is also listening on this port, but let’s ignore this fact for the moment. In our case ListenPort will become the outgoing port and our filter rules will prevent any incoming packets that are not covered by connection tracking. The directive Endpoint expects the hostname of the VPN server followed by a colon and the port number. Since we want to receive packets from the Internet through the tunnel, we set AllowedIPs to ::/0 .
The wg0 interface on the private router is similar to the one on the VPN server, just with opposite adressing. We add the interface configuration to /etc/network/interfaces :
After that we can fire up the interface using Debian’s ifup scripts:
Private Wifi
The RapsberryPi has built-in wifi that is compatible with hostapd , we can run a software access point on it. Hooray!
Here is how my /etc/hostapd/hostapd.conf looks like (except wpa_passphrase of course):
There is no need to start hostapd on system boot. The ifup scripts can take care of that when the wlan0 interface comes up. In my experience, the daemon comes up more smoothly this way. Now is also a good time to configure addressing on wlan0 in /etc/network/interfaces :
Let’s fire up the interface and test our configuration:
You should now be able to see and join the SSID privatewifi with your favorite device. However, joining may fail due to a lack of addressing. We need to distribute router advertisements to give joining devices a chance to learn about the on-link prefix. I may be biased towards the awesome ratools regarding this task 😉. However, as of August 2016, ratools is not available in Debian’s repositories and would require installation from source. To not make things more complicated as they already are, let’s stick with radvd which is old but mature:
Configuration for radvd takes place in /etc/radvd.conf :
This configuration just works and advertises reasonable values, although there is some room for improvements. You can play around with MaxRtrAdvInterval to directly save airtime or AdvPreferredLifetime and AdvRDNSSLifetime to indirectly save airtime by influencing client behavior.
Our Wireguard tunnel has a MTU of 1423 octets, and since we are going to push almost everything from the private wifi through the tunnel, we should advertise this limitation. This is why I put in the AdvLinkMTU option.
Please note that we already advertise the resolving DNS server here, which we will install and configure in the next step.
Let’s set up the forwarding and caching DNS server we just talked about. Again, unbound is our friend:
The /etc/unbound/unbound.conf configuration file looks a bit different this time:
The most important part is everything below forward-zone . The dot means all zones and forward-addr is the upstream DNS server to which we forward requests to. Make sure it is one of the listening addresses from the VPN server’s unbound.conf file.
Time to start the daemon:
And now, testing! Resolving a domain using our new DNS server should look something like this:
If everything works fine, enable the daemon:
Routing on the private router is slightly more complicated than on the VPN server. We have to use policy routing to make sure a packet never leaves our trusted networks, which are the tunnel and the private wifi. Even if a better route exists, the kernel must not forward any packet from a trusted network to an untrusted one.
First we have to enable forwarding via /etc/sysctl.conf :
And apply the change:
We will be using a custom routing table for the private wifi, as we don’t want packets from there to use the system’s main routing table. This allows us to route everything coming from the private wifi through the VPN tunnel, even though the system uses other routes for its own packets. Create a custom routing table by adding the line 200 privatewifi to /etc/iproute2/rt_tables . The file should look something like this afterwards:
This ensures the custom routing table will be created after the next reboot.
Now we have a custom route table, but it lacks content. It is just empty:
Here are the requirements for our custom routing:
- We want the custom table to be flushed before the VPN tunnel comes up, so that we start with a clean table every time the VPN flaps (if it flaps at all).
- We want the default route to point to the VPN server’s wg0 interface. This is the server’s in-tunnel address if you will.
- We want the interface route (on-link prefix) of interface wlan0 to be present in the table, so that local packets do not get routed away. Yes, sounds strange, but that does happen if the interface route is missing. Policy routing and custom routing tables are tricky sometimes.
- We want to force every packet that wants to leave the private wifi to use our custom routing table. Here is where policy routing jumps in.
Phew! If that’s a bit too much to comprehend, just go through the bullet points one more time and draw the situation with pen and paper. It’s OK to get confused when dealing with policy routing and multiple routing tables. Even the experts make terrible mistakes applying this magic sometimes 🤕
Here is how I implemented policy routing on the private router. I like to keep the rules separated by interface, and I also like to place them in /etc/network/interfaces :
Again, I assume we have a decent basic filtering set up. The following rules allow clients on the wifi to access the caching DNS forwarder. Since DNS queries and responses can be quite large these days, we also have to consider that some clients may ask using TCP.
Finally, clients may want to access the Internet. We therefore allow packets coming from inside the private wifi to be forwarded to the VPN server using the Wireguard interface wg0. It is very important that we do not allow any other outgoing interface! Having a strict forwarding rule prevents leaks caused by wrong routing. Wrong routing can happen if we made a mistake at the policy routing stage or if someone successfully injects wrong routes, e.g. via a compromised access device. Also, if the private router used without the additional protection of an access device, route injection becomes a more likely attack. So, here is the corresponding rule:
Connect Access Device
It’s simple, just connect your access device, e.g. the suggested Android smartphone, to the private router and start enjoying your encrypted wifi with secured Internet access.
A longer version is available, too.
To access the legacy Internet one could set up NAT64 (preferred) or run the whole setup dual-stacked. If you like to run a dual stack network, you just have to repeat the above steps involving IP addresses using legacy IP addresses and legacy networks instead. It is pretty straightforward, except one caveat: ICMPv4 path MTU discovery in this VPN setup is not working well with some legacy-only servers and websites (they still exist!). Some packets may be dropped just because of their size, with no way for a device connected to the private wifi to determine the right packet size. A quick and dirty fix is to mangle legacy TCP connections and force a lower maximum segment size (MSS) on them.
On the VPN server add this line to your filter rules:
Here is my private router in action at the Detroit Metropolitan Airport, providing secure wifi for my gadgets while waiting for my flight to DEFCON .

Update (July 2018)
I receive quite a few emails on the topics of OpenWrt and WireGuard every week. Unfortunately, I do not have the time to answer all of them individually. So I kindly ask you to direct questions regarding WireGuard and OpenWrt/LEDE to the OpenWrt Forums or to the WireGuard Mailing List . There the questions will be exposed to a wider audience and may additionally help other people facing the same challenges. Thank you!
Raspberry Pi VPN Travel Router
I. introduction.
Functionalities that even a simple consumer device has may entail the use of the internet as mobile. OS platforms move to cloud-based services for photo-sharing facilities, and messaging, Such loss control activities include video playback, etc. On the same note, the expansion of mobile data networks has enabled always It is in these “always on” connections for such devices, that overall users are surging through data at an unpredicted rate. Mobile carriers have therefore adjusted by bundling data in packages or slabs that usually come in gigabytes. moving away from unlimited data plans. In this regard, users delegate the reliance on Wi-Fi connections, especially available to save their allocated data since they are scarce.
Public wireless hotspots particularly at the local business places may not be established or managed by networking professionals. This can cause severe security problems like no isolation of the various components, that are used between clients, raising the possibility of launching man-in-the-middle attacks. Unrestricted access to the it is possible that through the router and access point’s device administration page an attacker could easily forcibly initiate connections with clients to genuine as well as fake as well as malicious websites.
Organizations have always insisted that workers use a VPN to connect to the internal network of the firm. However, the generic concept of benefits is also good for persons who wish to enhance security, overcome geographic restrictions or censorship, or remain anonymous while using the Internet. If for instance, it is a user intending to link multiple devices, this can be quite tiring and time receding as with software VPN turn clients differ from one another and from the operating systems they support whether it is Windows, Mac, or the mobile ones. Besides, some connections and disconnections need to be made once the software is installed and these are the VPNs for each device.
The Raspberry Pi is portable and can easily be taken along when traveling and uses normal electricity. amazingly just the micro-USB charger, makes it easier to carry while traveling as compared to the complicated wires. To connect the Pi to Users have the chance to set a public Wi-Fi and expand the device(s) to the cellular Bluetooth of the Pi simultaneously to discharge the requirement of any sort of wired networking at all. Where only the wired internet connection is possible then the following points have to be considered: which is also currently available on the Pi it also features an Ethernet port. Connection information and configuration already done could be manipulated like a consumer’s home router through a website interface or screens.
Thus, by having an easily accessible VPN connection, users can protect an increasing number of mobile systems when using public access points such as wireless LANs, Wi-Fi, or other wireless networks. Since all the traffic is rerouted and subsequently encrypted the traffic passes through the VPN connection before it is sent out on the internet, the flow of eavesdropping or man-in-the-middle attacks is minimized. Besides, one could also avoid the web filtering. blocking or slowing that may be against the principles of net neutrality.
II. Requirements
The Pi must allow the final user to connect their device(s) to a safe wireless network. A network that directs all traffic through a tunnel that is encrypted. It must provide support for connectivity. several devices. Moreover, these gadgets are capable of operating on any OS, including mobile systems. on a computer or laptop, as long as they are capable of connecting to a WPA2-secured wireless network. connection via ethernet. There is no extra client required in modern software VPN solutions, unlike the traditional ones.
software needed for user devices to establish a connection. The user should be able to choose between a wired or wireless internet connection for the Pi based on availability. One instance is that coffee shops typically offer WiFi but seldom provide customers with the option to connect using a wired ethernet connection. In certain situations, a location might provide only a wired internet connection, although this is becoming less common.
However, the Pi must be able to support both internet connectivity methods. Once connected to the secure wireless hotspot, users can access a web configuration page to select a public wireless network. It should provide them with essential connection details, display the wireless networks accessible, and enable them to join encrypted and unencrypted public networks. Once the Pi has internet access, users should have the ability to link their devices.
extra setup beyond what is typically needed to connect to the internet. The mathematical constant Pi will feature a secure wireless hotspot that looks identical to one created by a router for personal use by a customer. The user does not have to adjust any additional network configurations. rather than just inputting the WPA2 password during connection.
Once a user’s device is linked to the Pi’s Wi-Fi hotspot, they should be able to access the internet right away. They ought to have the capability to utilize any application in the usual manner. There is no indication that the connection is going through a VPN.
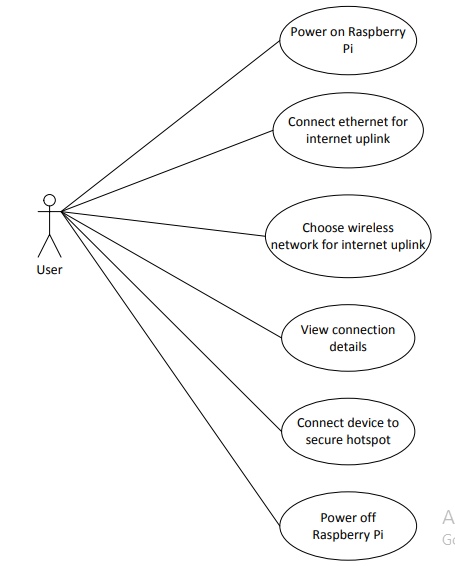
III. Use Cases
Public WiFi hotspots have become widely available for consumer use across various locations like restaurants and laundromats. Today, people often rely on these hotspots to keep their devices constantly connected online as they expect constant internet access. The Raspberry Pi can enable a secure connection to such hotspots for those seeking a private online experience.
While less common now, some public places like hotels may only provide wired internet access. Both wired and wireless could be options, but the wired connection performs better than a potentially weak wireless signal. This could prevent mobile devices like tablets and phones from accessing the internet since they typically don’t support wired ethernet. However, the Raspberry Pi could connect to the provided ethernet port to get online, and then broadcast a secure wireless hotspot for those mobile devices to utilize.
Public networks may filter certain sites or categories, blocking access. They could also prevent specific protocols often used by torrenting or email clients. Even if sites or protocols aren’t outright blocked, some traffic types may face throttling or prioritization. Assuming the Pi establishes a VPN tunnel, these restrictions could be bypassed. The network would only see VPN traffic and couldn’t prioritize or discriminate specific user services.
VPN traffic routed through the Pi enjoys strong encryption, potentially preventing network adversaries from spying on or intercepting user internet activity. While HTTPS-enabled websites generally allow safe use on public networks, not all sites use HTTPS by default or at all. Plus, some device apps may make insecure web requests without notifying the user, like an email client downloading mail in cleartext. The Pi routes all this traffic securely through a VPN tunnel, removing worries about interception for the user.
A. High-Level Design
This project aims to develop a secure VPN solution for end users in a compact, straightforward package. The device needs to be lightweight and portable as it will be used while traveling, not requiring a bulky power adapter. However, it must still have enough processing power to run a complete Linux system and function as a network router for multiple devices simultaneously. Minimizing hardware costs is important too, while open-source software keeps development costs at zero. Security serves as a chief motivator as well, only strong encryption can sufficiently safeguard user data passing through the device. The overall goal is to empower users with private, protected connectivity anywhere in a small, energy-efficient design.
Hardware Equipment Required
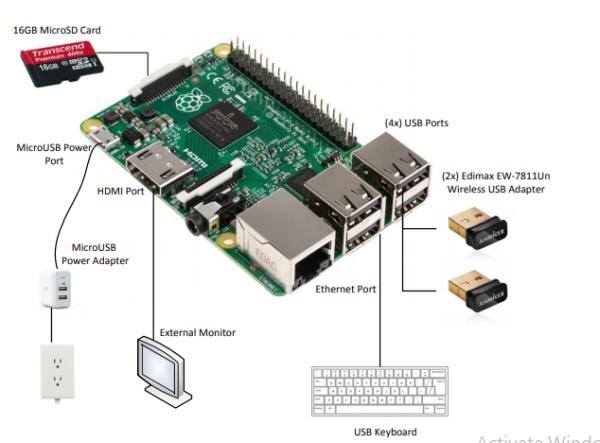
The key piece of hardware in my design is the Raspberry Pi 2 Model B. This small $35 computer is produced by the Raspberry Pi Foundation. It replaced the original Pi 1 with a faster quad-core processor and 1GB of RAM. Even though the Pi 2 was recently released at that time, I opted for it given the major performance improvements over the Pi 1. Specifically, my project requires the Pi to function as a full wireless and wired router while also handling the overhead of VPN-encrypted traffic. I knew the single-core CPU in the Pi 1 risked bottlenecking performance.
The Raspberry Pi has 4 USB ports, an Ethernet port, an HDMI port for video output, and a Micro SD card slot. It requires a 5V Micro USB power supply like most non-Apple phones use. I bought a dedicated 24W Anker dual USB wall charger for the Pi and used a portable USB power bank for mobility. For storage, I purchased a 16GB MicroSDHC Class 10 card for the operating system to boot from. 16GB provides ample space for the OS and configuration data.
The Pi 2 lacks built-in wireless, so USB adapters are needed – one to connect to public networks, and another to create a private wireless access point. I chose the Edimax EW-7811Un given its Pi compatibility and driver support for hosting an access point. For wired Ethernet, the built-in 10/100 port is used. One remaining USB port connects a keyboard, and an external display plugs into the HDMI port.
Software Requirements
The Raspberry Pi primarily uses Linux-based operating systems, though Windows 10 now offers an embedded version. The Raspberry Pi Foundation provides an installer called NOOBS to select several pre-installed Linux distributions. I chose Raspbian, the Debian-derived OS officially supported for Raspberry Pi. Raspbian optimizes Raspberry Pi hardware, and most guides/tutorials about Pi projects use it. The OS also provides tools to easily configure Raspberry Pi settings.
For VPN connectivity, I used the hosted VPN service VyperVPN to establish an OpenVPN connection from the Pi to the internet. OpenVPN offers better security than PPTP and faster performance than L2TP/IPsec. This requires installing OpenVPN client software on the Pi.
As mentioned, one wireless adapter hosts a private WiFi network for user devices to connect to. This necessitates creating a virtual software-based wireless access point. I used Hostapd, a Linux user space daemon for access points and authentication. A customized Hostapd package included the driver needed for the Edimax adapters in this project.
The Pi also runs a small web server displaying network statistics like the current VPN IP address. I used Flask, a lightweight Python web framework. When users connect to the Pi, they can access this webpage to view the information.
B. Lower Level Design
Operating system configuration.
The Raspbian OS will boot from the 16GB MicroSD card installed in the Raspberry Pi. A password will be set for the default Pi user account. The operating system will run without a full graphical user interface (GUI) or window manager, showing only a terminal console when connecting the Pi to an external display. All necessary project configurations and additions will be made through command-line interfaces. Required packages will be installed using apt-get unless a specific version other than what’s in the default repositories is needed. That ensures the operating system has everything needed to support the goals of this project from initial configuration to ongoing management purely via text-based interaction.
OpenVPN Configuration
VyperVPN, the hosted VPN provider selected, supports the OpenVPN protocol used in this project. VyperVPN manages their software, infrastructure, and servers to anonymously route users’ VPN connections on the web. I downloaded VyperVPN’s root certificate, used to authenticate the server during connection establishment, and a pre-configured .ovpn file specifying how to connect to a remote OpenVPN server. Most settings in this file were left as defaults, including AES-256-CBC for encrypting packets and SHA256 for authentication. Allowed OpenSSL TLS cipher suites, securing the control channel and key exchange, are DHE-RSAAES256-SHA, DHE-DSS-AES256-SHA, and AES256-SHA. I added VyperVPN’s username and password for OpenVPN authentication.
Upon connecting, OpenVPN creates a virtual TUN network adapter called tun0 and obtains an IP address for it from VyperVPN’s DHCP server. This VPN interface routes the user’s internet traffic through VyperVPN’s encrypted tunnel in a plug-and-play manner defined by the configuration file and default security parameters.
Access Point Configuration
The Pi needs to host a wireless access point (WAP) for users to connect to like any other wireless router. Hostapd provides this capability but the standard version lacks support for the specific Edimax USB wireless adapters used here with RTL8188CUS chipsets. A custom Hostapd build with this chipset support is available online and required. I compiled and installed this version on the Pi.
The Hostapd configuration was then modified. The WAP interface was set to wlan0, SSID to “securepinetwork”, WPA2 password “tester123”, channel 1, and chipset-specific hardware settings. Hostapd was started and configured to launch on boot.
Connecting clients should now receive an IP, gateway, and DNS servers. The Dnsmasq package provides DHCP and DNS services available on most Linux distributions. After installing Dnsmasq, its configuration assigned these roles and added them to the system startup. This way, associated clients get full network access through the Pi’s wireless access point.
Network Interface Configuration
The Pi will always have a minimum of three active interfaces: the virtual VPN adapter, wired/wireless uplink, and secure wireless hotspot.
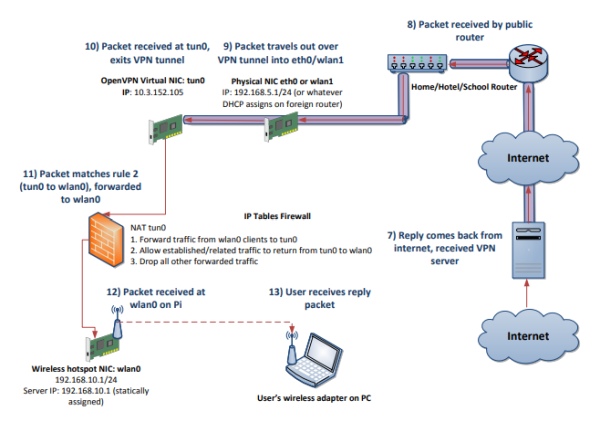
Tun0: The virtual VPN adapter, receives an IP and gateway via DHCP from VyperVPN. Anything connecting through this interface gets routed to the internet through a secure VPN tunnel. Eth0: Wired uplink interface, receives an IP and gateway via DHCP from the public network. This provides the Pi with an internet uplink, which it needs to establish a VPN connection to VyperVPN’s servers. Wlan0: Wireless hotspot interface, IP is statically set to 192.168.10.1. This represents the gateway interface used by devices connecting to the secure wireless hotspot. Wlan1: Wireless uplink interface, receives an IP and gateway via DHCP from the public network. This provides the Pi with an internet uplink, which it needs to establish a VPN connection to VyperVPN’s servers.
Firewall/Routing Configuration
The Pi must be configured to route packets across each interface appropriately. To enable this, IP forwarding must be activated in the Linux kernel.
Additionally, iptables packet filtering rules are required. Since the Pi functions as an internet router, Network Address Translation (NAT) should be enabled on the VPN and uplink interfaces: tun0, eth0, and wlan1. This permits translating IP addresses of packets moving from the internal private network to the external public one correctly. Iptables should forward new packets from the private internal network wlan0 through the VPN interface tun0 and returning traffic from tun0 back to wlan0. This permits clients on the private network to access the public internet while blocking unsolicited public internet traffic from reaching the private network.
Figure 3: Software Design Configuration
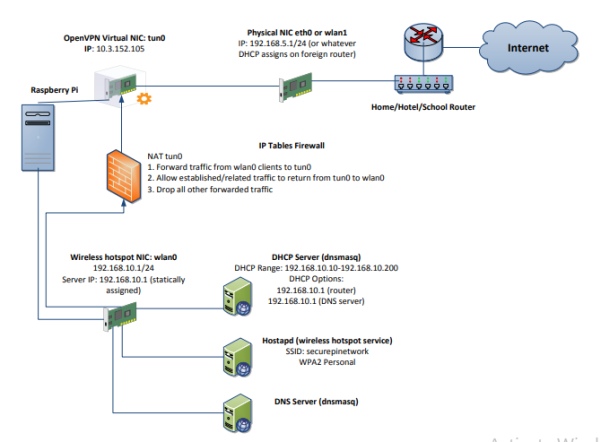
Figure 4A: Tracing a request from secure hotspot client to internet
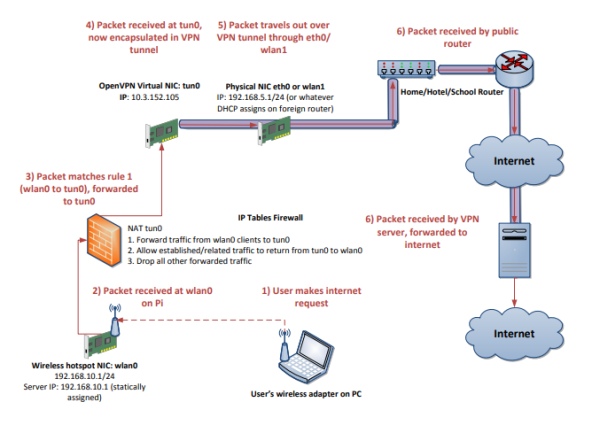
Figure 4B: Tracing reply from internet back to secure hotspot client
Web server configuration
A small web server runs on the Pi, accessible only to clients on the secure private network. It hosts a configuration/statistics page displaying network connection details. Flask, a Python web framework, runs it. For isolation, Flask is installed within a virtualenv, keeping the project environment (Python version, libraries etc.) separate. During development/testing, the server binds to all interfaces with debugging enabled.
Flask maps functions to URLs. The /config route serves the configuration page. Users access it by typing the Pi’s IP address, web server port, and /config, like ‘192.168.10.1:5000/config’.
A single Python script contains functions retrieving network interface data from Linux using imported modules. It returns this data in a usable format.
The page is rendered from an HTML template referencing variables passed from the Flask application. When called, render_template displays the template along with variables like public/VPN IPs and visible public wireless networks. Placeholders in the template populate with these values. Available encrypted public networks list along with password fields.
Web server usage
Connecting to an encrypted wireless network requires entering its password in the associated form field. Unencrypted networks omit a password field.
Selecting “connect” submits a POST request back to the application with the selected network and password. These details are written to wpa_supplicant’s configuration file. Wpa_supplicant reloads, initiating a DHCP request on the new network.
Once connected, OpenVPN restarts to reestablish the VPN tunnel securing the private network.
Users can also power down the Pi by selecting the “Power off” button at the bottom of the configuration page. This shuts the system down via the web interface for convenient remote management.
Figure 5: Web Configuration Page

V. Implementation
A. physical assembly.
For setup, the Raspberry Pi connects to its Anker wall charger power source using a Micro USB cable. Both Edimax wireless adapters plug into USB ports on the Pi. The MicroSD card inserts into the opposite slot. During testing and development, a USB keyboard and HDMI cable provide physical console access by connecting to the Pi as well.
This readies the necessary hardware components and interfaces to carry out configuration, installation of software packages, and validation that all elements function as intended before deployment.
B. Software Configuration
Operating system installation.
The NOOBS installer installs Raspbian. It can be downloaded from its URL.
I used a MicroSD adapter so the 16GB MicroSD card could be inserted into my Windows laptop’s SD card reader. Once visible, I extracted the previously downloaded NOOBS folder to the card.
Removing the MicroSD from the laptop, I inserted it into the Raspberry Pi along with a connected keyboard and HDMI display. Powering on, the Pi boots to a list of installable operating systems. I selected Raspbian to begin installing.
Upon completion, the raspi-config page loaded where I changed the user password and set the region to the US and timezone to PST. I also chose the “command line” boot environment since a desktop GUI isn’t needed. Selecting “Finish” opens the Raspbian terminal.
Most implementation commands require root privileges and will need to be prefixed with sudo. This readies the OS installation for configuring the security router functionality.
I installed Vim for use in editing configuration files:
$ apt-get install vim
Initial connection to an internet uplink
Initial connection to an Internet uplink Connecting to the Internet via ethernet simply involves connecting an ethernet cable to the port on the Pi. The Pi will detect the connection and acquire a public IP address via DHCP. Connecting via WiFi for the first time involves modifications to /etc/network/interfaces and /etc/wpa_supplicant/wpa_supplicant.conf:
$ vim /etc/network/interfaces
Wlan1 will be the interface used for connecting to a public wireless uplink and should have the following:
auto wlan1 allow-hotplug wlan1 iface wlan1 inet manual wpa-conf /etc/wpa_supplicant/wpa_supplicant.conf We then edit /etc/wpa_supplicant/wpa_supplicant.conf to specify a wireless network for wpa_supplicant to connect to: $ vim /etc/wpa_supplicant/wpa_supplicant.conf Finally, we can restart networking $ service networking restart OpenVPN Setup
- Download and install the OpenVPN package: $ apt-get install openvpn
- Download the OpenVPN configuration package from VyperVPN: 22 https://support.goldenfrog.com/hc/enus/article_attachments/205311978/VyprVPNOpenVPNFiles.zip
- Extract the zip and save the .ovpn file (I chose the USA – Los Angeles.ovpn file based on location) to /etc/openvpn/client.conf
- Create a login file under /etc/openvpn, with the first line containing the VyperVPN user and second line the password. This allows OpenVPN to login automatically without prompting for credentials $ vim /etc/openvpn/login.txt
- Edit /etc/openvpn/client.conf, find the line containing “auth-user-pass” and append “login.txt” to the end of the line: $ vim /etc/openvpn/client.conf auth-user-pass login.txt
- Enable the NTP service to ensure the Pi has a matching timestamp for OpenVPN: $ service ntp start $ update-rc.d ntp enable
- Start OpenVPN as a service and enable startup when the Pi boots: $ service openvpn start $ update-rc.d openvpn enable
- The Pi should now establish a VPN connection using the supplied OpenVPN connection. It will be accessible on the tun0 interface
Secure Access Point Setup- Hostapd Download, extract, and install the custom version of Hostapd with driver support for the Edimax wireless cards: $ wget https://github.com/jenssegers/RTL8188- hostapd/archive/v1.1.tar.gz $ tar -zxvf v1.1.tar.gz $ cd RTL8188-hostapd-1.1/hostapd $ make $ make install Edit the Hostapd configuration to contain the following: $ vim /etc/hostapd/hostapd.conf
Basic configuration
interface=wlan0 ssid=securepinetwork channel=1
WPA and WPA2 configuration
macaddr_acl=0 auth_algs=1 ignore_broadcast_ssid=0 wpa=3 wpa_passphrase=tester123 wpa_key_mgmt=WPA-PSK wpa_pairwise=TKIP rsn_pairwise=CCMP
Hardware configuration
driver=rtl871xdrv ieee80211n=1 hw_mode=g device_name=RTL8192CU manufacturer=Realtek Start the Hostapd service and enable startup when the Pi boots: $ service hostapd start $ update-rc.d hostapd enable Secure Access Point Setup-DHCP/DNS Install DNSmasq: $ apt-get install dnsmasq Edit the configuration to set DHCP options. The DHCP server should serve addresses from 192.168.10.10-192.168.10.200. It should push DHCP options for the gateway/router, 192.168.10.1 (the Pi itself) and DNS server, also 192.168.10.1. $ vim /etc/hostapd/hostapd.conf interface=wlan0 #wlan0 is our adapter for the hotspot dhcp-range=wlan0,192.168.10.10,192.168.10.200,2h dhcp-option=3,192.168.10.1 #router dhcp-option=6,192.168.10.1 #dns server dhcp-authoritative #make clients grab a new IP We will actually start the DHCP server in the next section after the network interfaces are probably configured first
Network Interface Setup I configured the interfaces configuration file with the following: $ vim /etc/network/interfaces Web Server Setup First, install Python and Virtualenv: $ apt-get install python-dev $ apt-get install python-virtualenv Create a Python virtual environment for Flask to use (we’ll call “wiconfig”) and activate it: $ cd /home/pi $ virtualenv wiconfig $ . wiconfig/bin/activate
Now install Flask inside the virtual environment: $ pip install Flask We can create the folder structure, with “app” containing the application itself: $ cd wiconfig $ mkdir app $ mkdir app/static $ mkdir app/templates Next, create an initialization script for the “app” package: $ vim app/ init .py from flask import Flask app = Flask( name ) from app import views This will create the application object and import the “views” module. The views model responds to requests from clients accessing the web server (e.g. web browsers). Our view function maps to a single request URL, the default root directory. It should be saved as views.py: $ vim app/views.py
Finally, we create a script that starts our web server with the application, run.py: $ vim run.py
!flask/bin/python
from app import app app.debug = True app.run(host=’0.0.0.0′) So, our directory structure is as follows: |—-wiconfig/ |——–app/ |————static/ |————templates/ |———— init .py |————views.py |——–bin/ |——–include/ |——–lib/ |——–local/ We can start the server by executing run.py from the command line. The webpage itself can then be accessed at http://192.168.10.1:5000/config when connected to the secure wireless hotspot.
VI. Results/Conclusions
I successfully followed my planned design, enabling clients to connect to a secure wireless hotspot routing all traffic through VyperVPN’s servers via an OpenVPN tunnel. The Pi supports either a public wired or wireless internet uplink. Configuring a wireless uplink required more implementation work for the web configuration page, as it must provide a preferred SSID and password for the Pi. Without this page, users connecting to the secure hotspot have no way to specify the wireless network.
Client performance connecting to the secure hotspot is generally consistent. Connections form quickly and internet access loads rapidly. Its range is less than a traditional router with higher power transmission but sufficient for intended short-range use. Download speeds are noticeably reduced versus direct public network connections, likely due to encryption overhead, hardware limitations, and using wireless for both uplink and hotspot. A more powerful system like the Raspberry Pi 3 may improve performance, though the Pi showed minimal CPU load during testing.
Early issues involved the Pi’s power source. A cheap phone charger occasionally caused errors referencing power in the OS console, sometimes temporarily corrupting the file system and preventing booting. Running fsck fixed this by repairing the MicroSD. I attributed this to the USB wireless adapters and keyboard drawing significant power over the USB bus. A higher-quality charger/cable remedied reliability problems. Alternately, using a powered USB hub could isolate devices from the Pi’s USB bus.
My original plan enabled ethernet or wireless client connection, but I opted only for wireless hotspot access. Nearly all modern devices support wireless, while performance impacts are small. Ethernet would introduce more configuration complexity versus the simplified wireless approach.
VI. Next Steps
Public networks like hotels often require accepting a captive portal before internet access. This prevents VPN establishment, temporarily exposing the client. For the Pi, captive portals could block the secure hotspot until the user accepts. One solution is MAC address cloning – having the Pi and client share an address so both authenticate after the user accepts.
Further development could enhance the VPN configuration page. Adding details like connected client counts and history assists in troubleshooting connectivity. Support for WPA-Enterprise networks like Cal Poly’s Mustang Wireless would expand compatibility. The page could store preferences for multiple wireless networks, adding or removing between uses.
Much testing occurred without security measures for public use. Additional precautions are needed. The web server should disable debugging, firewall public access, and migrate from Flask’s built-in server to production-grade Apache or NGINX. Form input on the configuration page requires validation and sanitization.
Performance may improve using a more powerful device than the Raspberry Pi for stronger wireless and throughput. However, this reduces portability advantages when traveling.
Appendix A. Iptables Rules
*nat :PREROUTING ACCEPT [82:6649] :INPUT ACCEPT [21:1600] :OUTPUT ACCEPT [40:2782] :POSTROUTING ACCEPT [6:426] -A POSTROUTING -o eth0 -m comment -j MASQUERADE -A POSTROUTING -o wlan1 -m comment -j MASQUERADE -A POSTROUTING -o tun0 -m comment -j MASQUERADE COMMIT
Completed on Wed Oct 28 20:26:49 2015
Generated by iptables-save v1.4.14 on Wed Oct 28 20:26:49 2015
*filter :INPUT ACCEPT [981:687162] :FORWARD ACCEPT [1669:717210] :OUTPUT ACCEPT [939:205723] -A FORWARD -s 192.168.10.0/24 -i wlan0 -o tun0 -m comment –comment “Allow only traffic from clients to tun0” -j ACCEPT -A FORWARD -i tun0 -o wlan0 -m conntrack –ctstate ESTABLISHED,RELATED -m comment –comment “Allow only traffic from clients to tun0” -j ACCEPT -P FORWARD DROP COMMIT
Appendix B. Web configuration page source
Views.py (main application)
from future import print_function from app import app from flask import Flask, render_template, request, redirect, url_for import socket import subprocess import sys import os import netifaces import wifi from wifi import Cell,Scheme @app.route(‘/config’, methods=[‘GET’, ‘POST’]) def config(): REMOTE_SERVER = “www.google.com” # adjust for what’s the internet interface # check if eth0 is active, otherwise default to wireless. get IP if active. try: addrs = netifaces.ifaddresses(‘eth0’) myip = addrs[netifaces.AF_INET][0] myrealip= myip[‘addr’] + ” (connected via ethernet)” except: myrealip=”N/A”
# check to see if wlan1 is active, get IP if active try: addrs = netifaces.ifaddresses(‘wlan1’) myip = addrs[netifaces.AF_INET][0] myrealip= myip[‘addr’] + ” (connected via wireless)” except: myrealip=”N/A”
# check to see if tun0 (vpn) is active, get IP if active try: vpn_addrs = netifaces.ifaddresses(‘tun0’) myvpnip = vpn_addrs[netifaces.AF_INET][0] myvpnrealip= myvpnip[‘addr’] except: myvpnrealip=”N/A” try: # check to see if we can resolve hostname host = socket.gethostbyname(REMOTE_SERVER) # connect to the host – can we actually reach it? s = socket.create_connection((host, 80), 2) connected=”Connected”
except: connected=”Not Connected”
#get available wireless networks networks = Cell.all(‘wlan1’) results = {} # form to get ssid/password and connect select_ssid = “N/A”
select_password = “password” # get current SSID from wpa_supplicant service wpa_process = subprocess.Popen(“wpa_cli status | grep ^ssid”, shell=True, stdout=subprocess.PIPE) stdout_wpa_process = wpa_process.communicate()[0].split(‘\n’)[0] print(stdout_wpa_process[5:], file=sys.stderr) current_ssid = stdout_wpa_process[5:] if request.method == “POST”: try: # check to see if power off button submitted, if so turn off the Pi poweroff = request.form[‘poweroff’] if poweroff == “true”: print(‘powering off…’, file=sys.stderr) subprocess.call([‘poweroff’], shell=True) return ‘Powering off…’ # get SSID from form select_ssid = request.form[‘ssid’] # get password from form, assume no password if blank try: select_password = request.form[‘password’] except: select_password = “” # write configuration file for wpa_supplicant wpa_config = open(“/etc/wpa_supplicant/wpa_supplicant.conf”, ‘w’) wpa_config.write(“ctrl_interface=DIR=/var/run/wpa_supplicant GROUP=netdev\n”) wpa_config.write(“network={\n”) wpa_config.write(‘ssid=”‘ + select_ssid + ‘”\n’) # if no password, the network is assumed to be unencrypted if select_password == “”: wpa_config.write(‘key_mgmt=NONE\n}\n\n’) # password provided so set it in the configuration else: wpa_config.write(‘psk=”‘ + select_password + ‘”\n’) wpa_config.write(‘proto=RSN\nkey_mgmt=WPA-PSK\npairwise=CCMP TKIP\ngroup=CCMP TKIP\nauth_alg=OPEN\n}\n\n’) # close configuration file wpa_config.close() # tell wpa_supplicant to reload configuration file subprocess.call([‘wpa_cli reconfigure’], shell=True)
# kill all previous instances of dhcp client subprocess.call([‘killall dhclient’], shell=True) # call dhclient to acquire a public IP via DHCP subprocess.call([‘dhclient wlan1 -v’], shell=True) # restart OpenVPN subprocess.call([‘sleep 5 && service openvpn restart’], shell=True) # return a 302 redirect back to config page after form submitted return redirect(url_for(‘config’)) except: # something bad happened print(‘exception’, file=sys.stderr) # render template return render_template(‘index.html’, connected=connected, myrealip=myrealip, myvpnrealip=myvpnrealip, networks=networks, current_ssid=current_ssid)
Source: Raspberry Pi VPN Travel Router
About The Author

Muhammad Bilal
I am highly skilled and motivated individual with a Master's degree in Computer Science. I have extensive experience in technical writing and a deep understanding of SEO practices.
Privacy Overview
Raspberry Pi Travel Router Takes Wi-Fi on the Go
There’s no place like 127.0.0.1.

The Raspberry Pi is well known for the fun projects you can make with it but there are also quite a few practical projects to take advantage of, as well. Today we’ve got an impressive Raspberry Pi project to share created by a maker and developer known as Tristam. Using our favorite SBC, he’s managed to create a travel-sized router that runs OpenWRT, an open source application designed for making your own Linux-based router.
Tristam used a Raspberry Pi 3B+ for this project, but there’s no reason you couldn’t use a Raspberry Pi 4 B in its place. To test the configuration, Tristam connected his Raspberry Pi to a Ubiquiti AC long-range wireless access point using the Pi’s onboard Wi-Fi support. Although this worked for his demonstration, you could easily connect the Pi to the internet using other sources like an Ethernet connection.
The project is totally open source and easy to duplicate. All of the systems used to operate the router are open source and free to use. He also created a custom case for the project that can be 3D printed . True to the open source nature of most Pi projects, it too can be downloaded for free for anyone that wants to use it.
The 3D printed case supports the Raspberry Pi 3B+ as well as the USB wireless card. In this case, Tristam is using an AR9271 but you could use another similar card in its place. For his project, Tristam printed the housing with a Creality Ender 3 v2 Neo. If you want to download the case to print yourself, you can find the files over at Printables .
The router functions are handled using OpenWRT and result in a familiar interface that’s very easy to use. To access router controls, just open a browser window and navigate to 192.168.1.1. Accompanying the OpenWRT application is AdGuard. This is another open source tool used to block ads and trackers at the DNS level.
If you want to recreate this Raspberry Pi project or just get a closer look at how it goes together, you’re in luck. Tristam was kind enough to share a detailed list of instructions for anyone who wants to recreate the project over at his official website .
Stay On the Cutting Edge: Get the Tom's Hardware Newsletter
Get Tom's Hardware's best news and in-depth reviews, straight to your inbox.
Ash Hill is a contributing writer for Tom's Hardware with a wealth of experience in the hobby electronics, 3D printing and PCs. She manages the Pi projects of the month and much of our daily Raspberry Pi reporting while also finding the best coupons and deals on all tech.
Best Raspberry Pi Projects: September 2024
Electronics builder qualifies for ‘Father of the Year’ with this Raspberry Pi-enhanced kids’ electric car
Asus's new triple-fan 4070 Ti Super is, somehow, SFF-Ready — Asus Prime unveils new OC AD102 GPU
- pixelpusher220 Adguard is open source? seems like a paid product... Reply
pixelpusher220 said: Adguard is open source? seems like a paid product...
TJ Hooker said: There's no reason you can't offer a paid product while also making the source code available. The value proposition for the paid version could be things like providing binaries, auto updates, support, hosting, etc. E.g. Canonical is a for-profit company. Their most well known product is Ubuntu, which is open source.
pixelpusher220 said: Same for RedHat. But they don't sell their software, they sell support services for it to my knowledge. That's not what this seems to be.
- View All 4 Comments
Most Popular
Finally, a geek travel router I love!
My ideal travel router.
I’ve been kicking around the idea of building a small travel router out of a Raspberry Pi or an Asus Tinkerboard for a while. My ideal product would be something that can connect to an upstream ISP via wired or wifi connectivity, while also having the horsepower to host a few web pages like a NextCloud site, or a Pastebin type page. Oh, and it has to be fairly easy to use.
The problem with using a Pi or a Tinkerboard is that no matter how many projects I’ve looked through, none of them offer “easy setup” and the ability to switch from WiFi to Ethernet easily (without running a script to update NAT). So I went hunting for a commercial, yet geeky, solution.
You might be thinking why use a travel router?
Well In some places (hotel room, company conference room, the van loaded with kids), WiFi sucks or is non-existent. Unfortunately, I frequent enough of those locations that I thought this was a worthwhile investment at $45 bucks.
I wanted the ability to find an RJ-45 wall jack and turn that into a WiFi hotspot for my devices; also the ability to share media files with anyone on the hotspot.
GL.iNet GL-AR750 Travel AC Router
So after some searching, I found the GL-AR750 and it seemed to have everything I really wanted built in. It also runs OpenWrt / LEDE which are open source projects so geek factor/hackability is still high!
Portability
This thing is super small! It’s on par with a Raspberry Pi that is in a case. In the pictures below I have my old vExpert gift from Datrium, although upgraded a bit, as you can see they are basically the same size.

I was pretty surprised that my old Mophie Powerstation 5X was able to power this thing for 24 hours. One of my hesitations with going with this router over some of the others on Amazon was that it didn’t have a built-in battery pack.
HooToo makes a travel router that is essentially a wall wart + battery + router all in one. I almost went with it, but I would have had to flash the firmware over to OpenWrt on my own. I have a HooToo TripMate Titan , and it works great for DLNA sharing in the car, but its webpage has no geek factor.
After plugging in the GL-AR750 for the first time I connected to its WiFi hotspot via the information on the bottom of the device. The interface is what I would have expected from a sub $100 dollar router, but I was O.K. with it because I knew OpenWrt was somewhere down below it.

As you can see I already have mine configured in this screenshot. But it was super easy, you simply click on the interfaces on the left menu, and you can configure how you want to get internet to the router, what the wifi interfaces SSID and password is, etc.
In the top ribbon you are also to add packages to the router, although most of the ones I found interesting were already installed.
The Cloud icon allows you to share links to files that are hosted on the routers SD card or USB drive, and share them externally with people on the internet.

The Share button configured LAN sharing of the SD or USB disk. Think Samba (Windows) file server.

UPnP server is pretty self-explanatory , so I’ll skip over that and get right to the OpenVPN section.
The OpenVPN area allows you to configure the router as an OpenVPN client, or server (currently in beta), as well as a PPTP client (also in beta). I only tried the OpenVPN client functionality and it seemed to work just fine. I also setup the slider switch on the side of my router to be “VPN On” and “VPN Off”.

I also tried out the 4G tethering capabilities too. It worked great! Basically all I needed to do was plug in an iPhone cord to the USB port, then plugin my phone and enable the hotspot after trusting the router.
Once everything said connected I went to whatsmyip.com on my laptop and sure enough a Verizon Wireless IP address!
This is pretty awesome because on road trips the kids want to stream stuff, as well as watch videos stored on a DLNA server in the van. This router will enable both of those things to happen! The HooToo TripMate Titan that we currently use in the car doesn’t offer 4G tethering, it does work well as a DLNA server though. (Something that the GL-AR750 doesn’t offer out of the box.)
Geek Usability
I know, I said this thing had geek factor; and so far I’ll admit… nothing too geeky. (other than carrying around a router in your laptop bag…)
As the saying goes “BUT WAIT THERE’S MORE”. Did you spot the “Advanced Settings” link in the top right corner of all those gui screenshots? If you did then you are the winner! (of nothing, sorry this isn’t a sponsored post)

Hidden behind that link is the LEDE / OpenWrt hardcore geek stuff. In fact if you click on the link there is actually a warning telling you that shit is about to get real!
Inside of here , you will find every setting you could possibly want. I’ll admit I haven’t explored everything, and I’m trying hard to keep my hands off of most of the stuff. With conference season quickly approaching (VMware VMworld, Microsoft Ignite, AWS Re :Invent ) I want to make sure that this puppy is rock solid, so I’m trying not to muck it up too badly.

After you login there is the advanced homepage.

Next up I have a screenshot of the Firewall configuration area. You can setup zones, do port forwarding, create traffic rules and more. Certainly full featured for almost all use cases.

For the rest of the screenshots I’ll just leave them in gallery format. If you want to see the large version of any of the images, just right click and open in new tab.

And lastly… just to so the real geeks can keep theirs under warranty… Here are the guts so there is no need to rip it apart. (at least until you brick it)

Would I buy again?
YES! While I haven’t conference tested this bad boy yet.. It has a 1 year warranty, it runs open-source community developed software, and it’s super compact! I think it will work great for what I need, and ill certainly update this post if anything changes after the conference. Thanks for reading!
Get one Here

Justin Paul
Justin is a blogger at https://jpaul.me who works for Zerto, a cloud data management and protection software provider. He is married and a father of three children. He is also a farmer in his "spare time". Justin also enjoys gardening and unwinding at the end of the day with a good bourbon whiskey.
Share This Post
Related posts.
Why I recommend CoSchedule for your blog!

Why you should get 2 GL-AR750S routers!
Geek stuff worth grabbing on #primeday, runecast analyzer – take my money already, 5 responses to "finally, a geek travel router i love".

Bought this one and the baby version. And I couldn’t be happier for now.
I think the call home feature is either for the firmware or DDNS feature it has out of the box.
Only one gripe I have is I wish I could use the sophos’s UTM APC files for ssl vpn (site to site) which would assist with a few other issues but I have found a way to bypass this for now
Pingback: The Geek Travel Router - Gestalt IT

Also have this device and love it! I also wish they had a model with a battery on it. That would really push it over the edge.
Pingback: Why you should get 2 GL-AR750S routers! | Justin's IT Blog

Did you have trouble with stability? I got one of these before I came across your blog article, and I was really excited about it. But, I found that it constantly dropped wifi connection with the “upstream” (hotel/host whatever) wifi network. I really wanted for this to work for me, but I ended up sending it back, because it just couldn’t keep a reliable enough connection things like Teams calls when I was on the go.
Post Comment
Navigation Menu
Search code, repositories, users, issues, pull requests..., provide feedback.
We read every piece of feedback, and take your input very seriously.
Saved searches
Use saved searches to filter your results more quickly.
To see all available qualifiers, see our documentation .
- Notifications You must be signed in to change notification settings
Supports multiple simultaneous WAN links (ethernet, wifi, iphone or android) plus captive portal login support , VPN management & TTL fixes to cloak detection of shared devices.
itiligent/OpenWRT-Raspi-TravelRouter
Folders and files, repository files navigation, openwrt raspi travel router build script, multi-wan tethering plus hotel captive portal auth & vpn support..
This OpenWRT build script & configuration file creates a Raspberry Pi 3 or 4 image supporting:
- Wifi as WAN client
- Built-in Ethernet as WAN
- iPhone tethered WAN
- Android tethered WAN
- Automatic WAN failover if multiple WAN connections exist. (Load balancing is also possible but not default).
- Packet TTL fixes to hide device sharing from upstream carriers
- OpenWRT extended GUI with "Travelmate" captive portal/VPN integration.
Instructions
Before you begin.
1. Research and obtain a Linux compatible USB Wifi adapter with a chipset that supports AP mode . (1st radio is for Wifi piggyback, 2nd radio is for all your Wifi clients).
2. Next confirm that the chipset of your USB wifi adapter is supported in OpenWRT:
- To learn more about USB wifi adapters with Linux/OpenWRT & AP mode support here is a great resource: https://github.com/morrownr/USB-WiFi .
- Search https://forum.openwrt.org/ to confirm and obtain the name(s) of the OpenWRT Wifi chipset driver package(s) required.
Starting the Build
3. Download the raspi-travelrouter.sh script and make it executable: chmod +x raspi-travelrouter.sh
4. Adjust the ARCH= & IMAGE_PROFILE= sections to suit your Raspi hardware (default is to build for Raspi 4).
5. On the last line of the CUSTOM_PACKAGES section of the script, add the USB device driver package names that you confirmed in the steps above. (The USB adapter drivers inlcuded in the default script are only examples and can be removed. See script comments for more). You can of course add any number of extra OpenWRT packages in this section to create your very own recipe.
6. Run the script as sudo and follow the prompts: sudo ./raspi-travelrouter.sh
7. When prompted to add custom OpenWRT config files, copy the unzipped contents of base-travelrouter-raspi.tar.gz to $(pwd)/openwrt_inject_files and hit enter to start the build.
8. When the build has completed, newly built firmwares for a range of install options can be found under $(pwd)/firmware_images . SquashFS will be the best choice for most applications.
9. Flash the new image to MMC in the usual way, insert it into your Raspberry Pi, then boot.
10. After first boot (give it some time), connect to the default "OpentWRT" SSID (no password) and browse to http://10.1.10.1 . You may then add a Raspi admin password and setup the SSID & upstream network connections through the Luci gui. Upstream wifi network piggybacking should be configured through the Travelmate page, whereas tethered phones or direct ethernet WAN links will automatically connect and share with your new SSID.
11. Optional. If you wire a power button across gpio_pin3 (Pin5) and any ground pin, adding dtoverlay=gpio-shutdown,gpio_pin=3 to the /boot/config.txt file enables both power ON and SHUTDOWN functionality.

- Shell 100.0%
- Worldschooling Topics
- Family Travel Resources
- Destinations
- Travel Tips
- Responsible Travel
- Family Gap Year Guide
- Places and Destinations
Best Travel WiFi Router (And 7 Tips for How To Use A Portable Router)

As a digital nomad family, one of the most useful tools for staying connected is a travel WiFi router. In this guest post, my husband, Clint Bush (who works full time as a software engineer), shares his reasons why you need a portable router for travel.
We’ve been working remotely since 2018. As a remote worker, it’s important to have consistent internet connection. Nothing is worse than being on a Zoom call (or leading a meeting, for that matter) and dropping out because of an unstable connection.

Even though we always get a local data SIM card, so we can use a WiFi mobile hotspot from our phone if the internet goes down, our travel WiFi router is by far one of the key tools in our digital nomad toolbox. Read this post to learn which travel WiFi router brands we prefer, and why you’ll want to travel with a portable WiFi router.
This post was written by Clint Bush and originally published on November 18, 2018.
This post may contain affiliate links. That means I may receive a small commission if you click on the link and purchase something. But don't worry, this will not result in any extra costs to you.
Table of Contents
Our top picks for a travel WiFi router
Want some quick tips for which travel WiFi router to choose? Here’s our top pick for a portable WiFi router, along with our pick for a mesh network and WiFi extender.
- Travel wifi router: GL. iNet Slate AX (GL-AXT1800)
- Mesh network: Amazon eero 6+ mesh Wi-Fi system (up to 4,500 sq. ft.)
- WiFi extender: TP-Link WiFi Extender (up to 1,200 sq. ft.)
What is a travel WiFi router?
For those who might not know the function of a travel WiFi router, here's a quick IT lesson. Internet connection gets sent in analog form through a cable from the cable company into your hotel or home. The cable connects to a modem that converts it from an analog signal to a digital signal.

A router then connects to the modem (or is built into the modem) via a cable. That router turns the internet signal into radio frequencies that are broadcast out. This is WiFi (short for wireless fidelity) - the radio broadcasting of internet signals.
Since the WiFi signal is a radio frequency, it is subject to interference that can be caused by other radio signals in the air, microwaves, concrete walls, etc. The point is if you only have a single router outputting a signal on one end of the house or hotel, and you are on the other end, how strong is the signal going to be?
For travelers, and especially digital nomads who rely on reliable internet for work, one quick fix is to carry a portable wireless router.
Travel WiFi router brands to buy
In terms of a good travel WiFi router, as well as a WiFi extender or a mesh network, there are several major brands out there. If you’re planning on using a virtual private network (VPN) such as ExpressVPN , they have a list of routers (such as the Netgear Nighthawk ) they directly work with, but I find them too bulky and expensive especially for travel.

I prefer a more compact travel router that can run OpenVPN directly. While this involves additional setup and requires some network knowledge (Express VPN has a good walkthrough ), the small size of the travel WiFi router makes it convenient for travel.
If you want to try out Express VPN, snag my referral code to get 30 days free !
One major advantage of the bulkier Express VPN-approved travel WiFi routers compared to a mini wireless router for travel is speed. This is especially important when using a VPN. Our small travel WiFi router does a great job, but if we need to stream video the travel router WiFi can’t always handle that. VPN speeds can throttle quite a bit. Getting one of the bigger approved routers can increase your connection speeds and handle larger bandwidth loads better.

Ready for a change? Take the first step to living a life of full time travel.
However, if you’re traveling, you’ll want to focus on compactness, rather than bulk. Besides a travel WiFi router, you can also consider traveling with a mesh network (multiple travel routers that connect to the original router to act as a single network) or a WiFi range extender (that extends your WiFi signal). Here are the top brands of wireless travel routers that we recommend.
We like GL.iNet because their products perform consistently well. We traveled with the GL.iNet GL-AR750 (Creta) travel WiFi router in the past, as well as an older version of the GL.iNet GL-MT3000 (Beryl) wireless travel router. However, there are plenty of other travel WiFi routers from GL.iNet that you can bring for your travels.
The GL.iNet travel routers we recommend have a USB port and an ethernet port (or multiple ports) so you can plug into the device directly. Click the buttons below to look at these travel WiFi routers from GL.iNet.
Amazon eero
If you’re planning on staying somewhere that will give you direct access to the original router, then bringing along a mesh network might be more useful than a single travel WiFi router. Essentially, a mesh network is a set of routers that link to the main router to create a blanket network throughout the space, sending consistent wireless signals. This is ideal if you’re planning on housesitting or staying at someone’s house, as you’ll likely be able to directly connect with the main internet router.
One drawback of traveling with a mesh network is that you’re bringing multiple devices instead of just one item (the mesh network usually comes in sets of 3). Additionally, mesh networks tend to have a higher price point (because they’re multiple devices), so you’ll need to be careful when traveling with these expensive devices.
Check out these mesh networks from Amazon eero.
We have not personally used TP Link, but have read positive reviews of their devices. Like GL.iNet, they offer a travel WiFi router that travelers can use. And like the Amazon eero, they also have a mesh network option.
TP Link also offers a dual band WiFi extender, which can help extend the range of WiFi signals from your Airbnb or hotel WiFi router, using both 2.4 GHz and 5 GHz frequencies. This extender requires a United States outlet for its power supply, but you can carry a power adapter if you’re traveling overseas.
One thing to note about using a WiFi extender, the strength of the signal will be weak at its farthest point of the extender range.
Learn more about the amazing family travel resources we use for worldschooling!

Benefits and tips for how to use a portable router
There are many benefits to carrying a travel WiFi router with you whenever you travel. Primarily, a travel WiFi router helps repeat the WiFi signal and minimizes the instances of spotty WiFi. Additionally a travel WiFi router allows for multiple devices to connect to the WiFi network, and allows for use of a VPN.

Once you know the benefits of having a travel WiFi router, it’s also helpful to know how to use a portable router. Here are some details of why a travel WiFi router is beneficial for travel, and how to use a portable router (and VPN) for travel.
1. WiFi repeating
This is the first benefit of your own travel wifi router: repeating the signal. Many routers these days have the ability to pick up an existing WiFi signal and extend or repeat that signal.
By placing an additional portable router closer to the WiFi signal, you can extend the distance of that WiFi signal. This increases your coverage across the house or hotel room. You will lose a bit of speed when you do this. Keep that in mind if you are trying to stream a video or play a game online.
2. Optional hard-wiring to skip spotty public WiFi
This tip will only help you if you are in a hotel that has an ethernet cable available to you. This is usually the case in business hotels, or if the home or AirBnB you are staying at has the router directly in the unit.

If either of these are the case, and you have the option to plugin an ethernet cable, then having a portable router can allow you to create your own WiFi network off of that wired connection. That means all of your devices can connect to a single WiFi source. This is way more reliable than the public WiFi available to you.
3. Easy connecting for multiple devices
One of my favorite reasons to use a portable router is the ease of connection setup when I get to a new location for all of our devices. Between our family we have multiple laptops, tablets, phones, and a Roku. Setting up each of these with new WiFi would be a pain in the neck.
My solution is to connect them to the WiFi network I created on the portable router. That way, I just set up the portable router at the new connection. Voilà one device setup and all devices are connected.
We’ve done this while we were slow traveling in cities like Jakarta , Indonesia and Guanajuato , Mexico.

Get weekly worldschooling tips sent to your inbox with my Worldschooling Wednesday email series.
4. Running VPN directly through a router
If you are using a VPN (and you absolutely should be using a VPN when you're connecting to WiFi outside your home!), you usually run it through each device through an application or VPN configuration. This works perfectly fine for my wife and me, since we remember to turn it on before using the public WiFi.

My kids, on the other hand, they never remember. So if they jump on a device, they are accessing the internet without protection. Of course, they are not logging into bank accounts or sharing sensitive information so it’s not that big of a deal. However, for ease of mind, I still want to make sure they are keeping our information secure.
Read up on the other useful travel gear and tools we travel with around the world.
5. Using a VPN Connection with your travel WiFi router
When it comes to choosing between using VPN vs travel router, there actually isn’t a choice. You should be doing both to ensure that your personal and confidential information remains secure.
Having a travel WiFi router that allows for VPN connection directly through the router is the way to go.
By running the VPN directly through the router, I now know that my kids are automatically connected to the VPN as soon as they start using their device.
6. Advantages of running a VPN through a router
There are several other advantages of running VPN this way too:
- ExpressVPN and other VPN services usually limit your devices you can connect to the VPN at a single moment. ExpressVPN for example limits you to three devices at a time. Have two phone and two laptops between my wife and I alone, we already exceed that. By running the VPN through the router, it only counts as one device rather than four.
- My work laptop can’t run a VPN application on it for a number of reasons, so using it through the router is the only option I have.
- Roku and other similar devices usually don’t have a way to connect to VPN, so running them through the router that has VPN is the only way to go.

Get prepared for any emergency with the insurance made for digital nomads!
7. Setting up your travel WiFi router
The actual steps on setting up a portable router will vary from router to router, but here are some tips that helped me:
- Find a spot that is centrally located if possible and sit the router mid-level or higher for best broadcasting.
- Plug the router directly into the modem or existing router if possible using an ethernet cable. This will give you the best signal strength.
- When repeating the existing WiFi signal, do some speed tests on the existing network to find the fasted available network to connect to. Sometimes that is only 1 network, so you won’t have any options there. If there are 5GHz vs 2.4GHz options, experiment with both to see which of the connections your router works best with. There’s a whole side discussion about 5GHz and 2.4GHz that I am going to skip for now, but hit me up if you have any questions regarding that.
- Plug the router into a surge protector if possible. Since it will always be plugged in, there is a high risk of power surge. Protect your investment by unplugging at night or plugging into a surge protector.
- Use a WPA-2 password key when creating your WiFi network on the router. This will give you the best protection.
- Remember when using your portable router, your data is not encrypted unless you are using a VPN. Sometimes there’s a false sense of security because you are using your own router and not the existing Public WiFi. Always use a VPN.
Learn about our digital nomad worldschooling lifestyle .
Travel WiFi router: a must have for digital nomads
For those of you living a nomadic lifestyle, and even if you aren't, having a reliable internet connection while you travel is important. There’s no need to be standing by a window all day hoping that your cell phone gets a strong enough signal to hotspot! Those days are over!

With a travel WiFi router (or a mesh network or WiFi extender), you can ensure that you stay connected to the internet. And that’s an important tool to have to help you live the digital nomad travel life of your dreams!
Do you have recommendations for your favorite travel WiFi router? Send me a message and let me know which travel WiFi router you prefer.
Are you wondering what other tools you need to lead a full-time travel lifestyle with your kids? Get a copy of my ebook, Hey Kids, Let’s Go Travel! to get started on planning a family gap year.

Need help thinking through how to budget for a family trip? My Travel Budget Worksheet is just the tool you need! Click here to receive your free copy by signing up for my newsletter.

Want to connect with me on social media? Find me on Facebook , Instagram , Pinterest , and Twitter. And for those of you who are dedicated to traveling more responsibly, sustainably, and ethically, join over 450 like-minded families on my Facebook group, Responsible Family Travel .
Sharing is caring!
Related Posts

Sign up to get travel tips in your inbox!
The 7 Best Travel Routers

Your changes have been saved
Email is sent
Email has already been sent
Please verify your email address.
You’ve reached your account maximum for followed topics.
- Brand Netgear
- Wi-Fi Bands 2.4GHz, 5GHz
- Ethernet Ports 1
- Brand TP-Link
- Brand TP-Link
- Wi-Fi Bands 2.4GHz
- Brand GL.iNet
- Brand RoamFi
- 9.40 /10 1. Premium pick: Netgear Nighthawk MR1100-100NAS
- 9.20 /10 2. Editors choice: TP-Link TL-WR902AC
- 9.00 /10 3. Best value: TP-Link N300 TL-WR802N
- 8.80 /10 4. GL.iNet GL-E750 Router
- 8.60 /10 5. RoamWiFi Router
- 8.40 /10 6. MIGHTYWIFI Router
- 8.20 /10 7. GL.iNet GL-AR750S-Ext Router
In this modern world, staying connected to the internet, even when you are on the go is an essential part of life.
The best travel routers can enable you to connect several devices while providing you with a secure, fast, and reliable internet connection anytime you’re on the move. Pair it with a Cat 8 Ethernet cable , and you have one fast travel setup.
They perform like other home Wi-Fi routers, only that they are compact for portability. However, buying a travel router can be a daunting task since there are many distinct features to consider such as wireless frequencies, size, bandwidth, speed, and security protocols.
Here are the best travel routers available today.
1. Netgear Nighthawk MR1100-100NAS
Reliable and aesthetically pleasing, the Netgear Nighthawk MR1100-100NAS is an excellent pick if you’re always on the move. It achieves a blazing-fast download speed of up to 1Gbps, enabling you to hold uninterrupted video calls and play games without experiencing buffering. Speed isn’t the only standout feature in this router, so something else you’ll love is its long battery life.
The 5,040mAh battery can power you for a whopping 24 hours when browsing from one device, so you don’t need to carry charging cables when traveling for a quick business meeting. The router delivers a safe and speedy internet connection to 20 devices, so family members on vacation can browse and chat online effortlessly.
Instead of featuring the typical rectangular shape in most routers, Netgear Nighthawk MR1100-100NAS goes for a cube-like look with rounded edges. It blends well with the surrounding, plus there’s a 2.4-inch screen for viewing essential information. You can check the total amount of data used, signal levels, and more.
- Qualcomm MDM9x50 chipset
- Requires a nano SIM card
- Comes with one Gigabyte ethernet port
- 2.4-inch LCD screen
- Brand: Netgear
- Wi-Fi Bands: 2.4GHz, 5GHz
- Ethernet Ports: 1
- USB Ports: 2
- MU-MIMO: No
- Mesh Network Compatible: No
- Excellent battery life
- Nice-looking design
- LCD screen displays valuable information
- Enables 20 people to connect their devices simultaneously
- Relatively bulky
2. TP-Link TL-WR902AC
Compact and versatile, the TP-Link TL-WR902AC is an exceptional solution for anyone who needs a secure and ultra-fast network connection when traveling. The router supports dual-band Wi-Fi, allowing you to enjoy fast connections on both demanding and less demanding devices.
The 5GHz band achieves a wireless speed of up to 433Mbps and 300Mbps on the 2.4GHz, so you can stream and download movies seamlessly. Measuring 2.64 x 2.91 x 0.87 inches, the TP-Link TL-WR902AC is designed with traveling in mind. You can position it on your lap when commuting without feeling uncomfortable.
Setting up the TP-Link TL-WR902AC is quick and easy, requiring you to follow the prompts in five steps. You can also access the advanced settings to set up device connectivity, connection schedules, and more. There’s a multi-functional USB port that lets you charge your smartphone or share files via the internet browser to other devices.
- Pocket-sized design
- Multi-functional USB
- Brand: TP-Link
- USB Ports: 1
- Mesh Network Compatible: Yes
- Sturdy body
- Quick setup process
- Useful USB port
- Fast wireless connection
- Included cables could be longer
3. TP-Link N300 TL-WR802N
Despite its compact design, the TP-Link N300 TL-WR802N delivers excellent wireless performance to cater to your frequent streaming needs. The router provides you with a consistent speed of up to 300Mbps when on the 2.5GHz frequency band. There are minimal chances of encountering network interruption, so you can play online games, video call clients, and stream videos seamlessly.
Security is top-tier since the router includes the WPA2-PSK, WEP, and WPA-PSK protocols. They add more robust encryption and authentication to your network, protecting your most critical information from intruders. The Repeater, Bridge, Access Point, Client, and Router modes have different network functionalities, enabling you to pick one that matches your needs.
This router occupies less space when tossed in a slim clutch bag as it only measures 2.2 x 2.2 x 0.7 inches. Parents who frequently travel with their kids will appreciate the parental control mode. It lets them block access to inappropriate websites for their kids’ safety.
- Compatible with 802.11b/g/n Wi-Fi routers
- Works with 2.4GHz devices
- Advanced security protocols
- Brand: TP-Link
- Wi-Fi Bands: 2.4GHz
- Easy to carry
- Parental control feature
- Delivers seamless internet connection
- Limited range
4. GL.iNet GL-E750 Router
If you want a travel router that delivers top-notch speed without compromising security, consider the GL.iNet GL-E750 Router. This travel router ensures travelers have a safe internet connection as it supports multiple open-source VPN protocols, which come in handy when handling sensitive data.
Its WireGuard encryption also utilizes the latest encryption protocols, like Curve25519 and SipHash24, ensuring fewer security vulnerabilities. The dual-band Wi-Fi frequencies with 733Mbps throughput enable you to enjoy a lag-free internet connection on various devices. Battery life is impressive as the GL.iNet GL-E750 Router comes with a 7,000mAh battery. It powers you for up to eight hours when on the move.
You can also turn on the standby mode to put the screen into sleep to extend the battery life. The Mudi app features a highly responsive and user-friendly web control interface. It lets you enter your credentials when connecting to different VPN services and access other valuable settings.
- DDR2 128MB RAM
- Combined Wi-Fi Speed networking
- Eight hours battery life
- Supports over 30 VPN service providers
- Brand: GL.iNet
- USB Ports: No
- WireGuard encryption
- 4G LTE support
- Ideal for frequent travelers in need of a highly secured network
- Delivers speedy performance
- Small display easily attracts smudges
5. RoamWiFi Router
The RoamWiFi Router easily outperforms its counterparts with its incredible battery life and speedy internet connection. Speed-wise, the travel router has a download speed of up to 150Mbps and 50Mbps upload to cover your unique needs. Business colleagues and family members traveling together will love the convenience this router offers. It allows five people to connect their computer or smartphone simultaneously for maximum productivity.
Besides featuring an elegant design, the RoamWiFi Router is highly portable. It measures 2.68 x 0.57 x 4.96 inches, so you can comfortably tag it along with your other traveling essentials. You get around 18 hours of continuous internet surfing, thanks to the 5,000mAh built-in battery.
Such power makes it easy to watch live broadcasts, attend zoom meetings, and watch shows without worrying about low battery. The RoamWiFi Router provides reliable network speed and protection in over 160 regions. As such, you won’t have a problem communicating with family members back at home when you travel.
- Connects up to five devices
- 5,000mAh in-built battery
- Covers over 160 regions
- Supports the RomaWiFi App
- Brand: RoamFi
- High-speed performance
- Allows you to pay as you go
- Only connects to five devices
6. MIGHTYWIFI Router
The MIGHTYWIFI Router performs incredibly well, making it a great pick. Onboard is a Qualcomm processor which enables the router to pick signals from a local network, resulting in fast network performance. The dual-band frequency support is an invaluable feature that saves you from interference seen in a single band.
You get up to 150Mbps download and 50Mbps upload speeds for a seamless experience when surfing the web. With the MightyWifi app, you can manage data usage and access other helpful settings. There’s an in-built 5,000mAh battery that powers you for around 12 to 14 hours on a single charge. It saves you from the inconvenience of looking for a power outlet when relaxing in open fields.
10 of your friends or family members can connect to this router and enjoy an uninterrupted wireless connection. Compact and slim, this travel router fits well in your pockets, or you can toss it in your clutch bag.
- Works in over 150 countries
- Versatile Qualcomm processor
- 5,000mAh battery
- Brand: MIGHTYWIFI
- Great battery life
- Easily portable
- Easy to use
7. GL.iNet GL-AR750S-Ext Router
The GL.iNet GL-AR750S-Ext Router addresses the eavesdropping network layers and pay-by-device Wi-Fi annoyances experienced in hotel rooms. With its compact design, only measuring 3.9 x 2.7 x 0.9 inches, this router fits nicely in your pockets. It also delivers incredible Wi-Fi speeds.
The available 2.4GHz and 5GHz signals provide a rate of up to 300Mbps and 433Mbps, respectively, allowing you to enjoy seamless connection in various devices. The GL.iNet GL-AR750S-Ext router comes with two foldable routers, which increase the router’s capacity to receive and transmit data. It operates on the OpenWRT operating system, ensuring you access better security features and configuration options.
The 16MB of NOR flash and an added 128MB NAND flash for OpenWRT enable you to install torrenting clients, ad blockers, and other packages. The custom web interface makes it easy to see new features after a firmware update.
- 2.4GHz and 5GHz signals
- 16MB of NOR flash
- Three customizable LEDs
- DDRII 128MB memory
- Ethernet Ports: 3
- Simple setup
- Incredible VPN support
- Useful OpenWRT operating system
- Total bandwidth is pretty low
Q: How Do I Fix Common Problems in Travel Routers?
Resetting your router is one of the first steps you should take after experiencing connection issues. You’ll only need to press and hold the reset button for around 15 seconds to allow the router to restore its default settings.
Most travel routers cover small ranges, so the Wi-Fi network may only reach the corners of your room. Such routers struggle to deliver reliable connections because of physical distractions like metal and electric devices. Always place the router in a central location free from such gadgets and walls to avoid signal dropouts.
Like most electronic devices, travel routers overheat after continuous use, causing instability. If the router gets extremely hot, power it off to let it cool down for some minutes. Additionally, check whether the Ethernet cable is damaged or loosely connected before visiting a technician.
Q: How Do Travel Routers Work?
Although travel routers have distinct features, their primary role is to increase the range of existing wireless networks. Travel routers allow you to connect to a network you had difficulties connecting to, like in a hotel. They pick weak signals and amplify them, allowing you to enjoy fast internet connections.
Unlike Wi-Fi networks in hotels which limit you to connect only one device, travel routers let you use multiple gadgets, even with a single login. You only need to log in once through the provided smartphone app or web browser, and then all your devices will connect to the created network.
Q: Are Travel Routers Worth It?
Yes, they are. Well, most airports, hotels, Airbnb’s, and coffee shops give you access to Wi-Fi connections that require no password. However, such networks are insecure since they don’t have encryption protocols, making your crucial data and information vulnerable to hackers. The best travel routers feature top-tier security encryptions like WPA2 and WEP, which are similar to what your home router offers.
They also have built-in VPNs which secure and isolate your communication, so you can confidently handle sensitive tasks. Besides offering you a secure network, most travel routers are pocket-sized, making it easy to carry them when on the go.
How-To Geek
Get a travel router to upgrade your hotel wi-fi experience.

Your changes have been saved
Email is sent
Email has already been sent
Please verify your email address.
You’ve reached your account maximum for followed topics.
Quick Links
What's a travel router, why use a travel router in a hotel, which travel router should you get.
You might not have "travel router" on your vacation packing list, but after reading this article, you just might. Here's why we always pack a router with us when we're headed to a hotel.
A travel router is a small network router designed with an emphasis on portability and use in-the-field. While you could, in theory, use a travel router as an internet router in your home, it's not intended for that.
Instead, travel routers are meant to link together a smaller number of devices all congregated fairly close together. Think, your laptop and phone, your kids' tablets, and maybe even a streaming stick in a hotel room---not all those things plus a pile of computers, smart devices, and such spread out across your whole home.
They typically have a very small form factor, the size of a portable battery pack or even smaller. Speaking of that, many of them are portable battery packs, so you can use them to charge your phone while you travel in addition to their router function.
Further, unlike the router you have at home, travel routers have UI elements and even physical toggles that make it easy to quickly switch them between functions like router mode, hotspot mode, repeater mode, and so on.
That last part is crucial. You want a travel router that can easily connect to the hotel's internet in different and reliable ways. In some hotels, you can plug the travel router directly into a courtesy Ethernet connection in your room, which is easy peasy.
In other hotels, there's no physical internet connection, and you have to connect the travel router to the hotel's Wi-Fi and use it in hotspot mode, where it captures the Wi-Fi connection, and then all your local devices connect to the travel router instead of the hotel's Wi-Fi system.
You might be thinking, "Well, that's all very fascinating, but I have no idea why I would go to the trouble?" And that's certainly a fair question to have on your mind if you've never considered packing a router (no matter how small it might be) along with your toiletries and phone charger .
Historically, one of the best reasons to pack a travel router was that many hotels didn't have Wi-Fi (they only had an Ethernet port in the room for business travelers to plug in their laptops).
Later, when hotels started to get Wi-Fi, they had frustrating policies like only one or two devices per guest/room were allowed on the network. Even today, some hotel Wi-Fi systems still have such rules.
When you use a travel router, you can "log in" just the travel router to the hotel's system so, as far as they are concerned, there is only one device in the room. All the traffic of the other devices passes through the travel router.
Speaking of device traffic, you can also leverage the travel router to increase your privacy. Most travel routers support basic VPN protocols like PPTP or L2TP, and the more advanced ones support OpenVPN and WireGuard .
That makes it simple to tunnel right from your room to a third-party VPN or right back to your corporate or home VPN server. It also makes it easy to transfer files securely between your devices as the file transfer is happening over the micro network you set up, and the files never pass through the hotel's infrastructure in any way.
It also makes it much easier to use your devices in the fashion you're accustomed to. You could set your travel router's Wi-Fi credentials to match your home network's Wi-Fi credentials, for example. Not only does that make it dead simple to log in when you get to your hotel (as your phone and laptop already know the way "home"), but you can even toss your Chromecast or favorite streaming stick into your bag and use it in your hotel room. Forget the stupid "smart" TV interface hotels have, enjoy your streaming services the way you want without the lag.
Above all else, when you're shopping for a travel router (whether you pick one of our suggestions or forge out on your own to do some research), you need this feature: captive portal connectivity.
You know how when you first connect to a hotel's Wi-Fi there is usually a pop-up page where you accept the terms and conditions and/or login with your name and room number? That's the portal. You need a router that "capture" that exchange and mimics your initial login device (like your iPhone).
All of our picks below support easy captive portal exchanges, which makes the setup when you first get to your hotel room a breeze. Without that feature, you're left manually cloning your original login device's MAC address which usually works but can be hit or miss.
One of the most popular options on the market is the TP-Link N300 Nano Router . It's a steal at around $30, but it's starting to show its age.
It only supports 802.11n (Wi-Fi 4) on the 2.4 GHz band. But for only ten bucks more, you can jump from the N300 Nano Router to the TP-Link AC750 Nano Router .
TP-Link TL-WR902AC AC750
It's tiny, inexpensive, and our all-around top pick for best travel router. For most folks, it's the easiest solution.
The upgraded model features dual-band Wi-Fi, 802.11AC (Wi-Fi 5), and a really convenient switch on the side that makes it dead simple to change modes without logging into the router.
While we love the TP-Link Nano lineup, especially the newest models, and think they are the best fit for just about everyone, there are a few other options to consider.
If you want more advanced VPN solutions, you'll need to step beyond the TP-Link offerings and consider something like the GL.iNet GLMT300N ---it's roughly equivalent to the TP-Link N300 Nano Router but runs the popular OpenWRT router firmware and supports both OpenVPN and WireGuard.
And if you want a beefy upgrade over the TP-Link AC750 Nano Router consider the GL.iNet GL-A1300 .
GL-iNet GL-A1300
For power users that want passthrough connectivity for Ethernet devices and advanced VPN services like WireGuard, this travel router delivers.
It also runs OpenWRT firmware and robust VPN support like its smaller sibling, but includes two additional Ethernet ports, support for many more Wi-Fi devices, and more.
But whichever of our picks you go with, you'll become the master of your Wi-Fi destiny when you're on the road. Forget cruddy hotel Wi-Fi or frustrating Wi-Fi rules. Plug in your own router and go. And hey, if you're in the upgrade mood, here are some other travel gadget upgrades worth looking at.
IMAGES
VIDEO
COMMENTS
Building a travel router. Confession: I did spend a little money on this project, just because I wanted the Raspberry Pi in a more robust case than what I had buried in my entertainment center ...
Step 2: Initial Configuration. By default, OpenWRT defaults to a static IP address of 192.168.1.1, which is the default gateway IP for many routers. You'll need to change this to prevent conflicts. Connect your Pi to your PC using an Ethernet cable; you may need to set a static IP on your PC first.
Step 3: Configuring OpenWRT Network. Next, we need to update OpenWRT. In order to do that, we need to enable the Raspberry Pi's built-in WiFi by editing the wireless file in the /etc/config directory. Use the following code to make changes to the wireless file: vi /etc/config/wireless.
Don't worry, you can build one with a Raspberry Pi. It's the perfect choice for a DIY VPN travel router, so let's walk you through how to build one.". A list of components you will need to complete this project include. - Raspberry Pi (Pi 3 or Raspberry Pi Zero W preferred) with case. - A single USB Wi-Fi adapter (two, if you're ...
This has been months in the making, my new Mobile HomeLab! It's a device that I can take with me to provide secure internet access for all of my devices. Not only can it provide secure access, but it can also let me bring apps and services with me when I travel. It's built on Proxmox, OpenWRT, Pi-hole, and many other services.
It's the perfect choice for a DIY VPN travel router, so let's walk you through how to build one. Published by Ben Stockton, this new Raspberry Pi project features a Raspberry Pi Zero W or a larger Raspberry Pi 3 mini PC depending on your requirements and budget.
The private router provides the private wifi and acts as the client side of the tunnel. I chose a RaspberryPi 3 as hardware platform for the private router, because it has a built-in wifi chip. Other platforms work well, too. I had this setup working on much smaller devices, too, e.g. an OpenWRT-capable router of the size of an USB thumb drive.
*** UPDATED VIDEO ***Here is a new updated version of this video:https://youtu.be/3PvDqb66Rw4This video talks about how we can turn a Raspberry Pi into a tra...
Once connected, OpenVPN restarts to reestablish the VPN tunnel securing the private network. Users can also power down the Pi by selecting the "Power off" button at the bottom of the configuration page. This shuts the system down via the web interface for convenient remote management. Figure 5: Web Configuration Page.
DIY Raspberry Pi VPN secure travel router. 10:04 am February 26, 2019 By Julian Horsey. DIY Raspberry Pi VPN secure travel router. Share. Tweet. Pin. Email. Filed Under: DIY Projects, Top News.
The router functions are handled using OpenWRT and result in a familiar interface that's very easy to use. To access router controls, just open a browser window and navigate to 192.168.1.1 ...
The OpenVPN area allows you to configure the router as an OpenVPN client, or server (currently in beta), as well as a PPTP client (also in beta). I only tried the OpenVPN client functionality and it seemed to work just fine. I also setup the slider switch on the side of my router to be "VPN On" and "VPN Off". Tethering
My solution for a pi-hole / travel router combo. I just use wireguard to vpn back to my pihole at home. Works perfectly. Same — imo this is easier, cheaper, and more convenient. My internet is actually faster through the WireGuard vpn than without due to the lack of ads so it isn't a shit connection either.
Supports multiple simultaneous WAN links (ethernet, wifi, iphone or android) plus captive portal login support , VPN management & TTL fixes to cloak detection of shared devices. - itiligent/OpenWRT-Raspi-TravelRouter
Here are the top brands of wireless travel routers that we recommend. GL.iNet. We like GL.iNet because their products perform consistently well. We traveled with the GL.iNet GL-AR750 (Creta) travel WiFi router in the past, as well as an older version of the GL.iNet GL-MT3000 (Beryl) wireless travel router. However, there are plenty of other ...
Building My Own Wireless Router From Scratch. Tutorial. Some times ago, I decided to ditch my off-the-shelf wireless router to build my own, from scratch, starting from Ubuntu 18.04 for (1) learning purposes and (2) to benefits of a flexible and upgradable setup able to fit my needs. If you're not afraid of command line why not making your own ...
8.60 /10 5. RoamWiFi Router. 8.40 /10 6. MIGHTYWIFI Router. 8.20 /10 7. GL.iNet GL-AR750S-Ext Router. View All. In this modern world, staying connected to the internet, even when you are on the go is an essential part of life. The best travel routers can enable you to connect several devices while providing you with a secure, fast, and reliable ...
Installing and Using OpenWrt. Gisean04 April 10, 2023, 6:34am 1. I'm trying to set up a travel router. I followed all the guides and I cannot get my Router to broadcast or sign into a wifi network. I'm using a system on chip board that is supported. I found wifi adapters using List provided on open w r t hardware.
It's tiny, inexpensive, and our all-around top pick for best travel router. For most folks, it's the easiest solution. $34 at Amazon. The upgraded model features dual-band Wi-Fi, 802.11AC (Wi-Fi 5), and a really convenient switch on the side that makes it dead simple to change modes without logging into the router.
This is exactly what WireGuard VPN is for -- send all your traffic through a tunnel back to your home ISP, no matter what external network you're on. With a travel router you can potentially set up the tunnel and have multuple devices connect through it. If only 1 device, then i don't understand the need for this.
Alternatively, I would buy a better Travel Router, but they seem pared down in the hardware department, and I can't find many reliable reviews online. Do you guys have any suggestions for a solution that would provide a better experience overall? Would any consumer home router be able to provide Travel Router functionality, even with custom ...
Building the Y and Z axis of my DIY CNC Mill/Router
Watch how we built a fully functional wooden go-kart made entirely on a CNC router! This DIY plywood go-kart, powered by a cordless drill, has taken years to...
Pretty much all their routers offer clean OpenWrt builds next to their branded ones - though I found the GL interface with optional LuCI much more user friendly than the raw OpenWrt experience. It is true that GL.inet has their own opkg repo, and their builds are a bit older (most routers are still waiting for a 19.07 build), thus latest ...
It is a great little travel router. Reply reply Top 4% Rank by size . More posts you may like r/AV1. r/AV1. Subreddit for AV1 video codec Members Online. Apple introduces M4 chip with AV1 hardware decoding ... HOTAS (hands on throttle and sticks) > Reviews > Sales > DIY > Pictures > Q&A > Tutorials and everything HOTAS related.